When creating a new list, select the gear icon in the upper right corner of the Incomaker interface and then “Segments and tags”.

The “Mailing lists” tab – “Segment categories” – here select the name of the mailing list where you want to create a new list and choose “Select”.

“Segment value” – “Add mailing list”.
After clicking on “Add mailing list”, it will be created here and you can rename the list.
If the standard data fields that Incomaker stores for contacts (such as name, date of birth, city, etc.) are not sufficient for you, you can define custom fields and work with them in the same way as basic fields. For example, you can define that you want to record customers’ shoe size, their latest answer to a survey question, or anything else. You can import data into these fields, upload it externally, input it through forms that Incomaker offers, or by any other method.
Incomaker allows you to work with any type of data: numbers, texts, and even structured data such as arrays or value trees.
In this guide, we will focus on simple data fields.
First, you need to create such a data field. You can do this in Basic Settings:

Click on the Custom Contact Field Settings Tab:

Here, you can create any simple variables. Enter the field name and machine name. These two names can be identical; however, the machine name must not contain spaces, and it is recommended to avoid using diacritics.
Once you save the field by clicking Add, you can then work with it like any other variable.
Working with Custom Contact Fields
The custom field is visible among other fields in a contact’s details. For example, you can open the Contacts tab, view the contact list, select a contact, and open it by clicking the button on the right.

The contact will open, and you will see the custom fields that you can edit at the bottom in the Custom Contact Field section.

You can use such a field in a form, landing page, or pop-up, and you can also utilize this data field in mailings, SMS, or any other channels, such as input for reporting or many other ways.
Do you want to better target your advertising campaigns and increase your chances of conversions? To help with this, Incomaker has introduced the option to share audiences with Sklik, allowing you to reach specific groups of users.
How to do it?
Start by clicking on the “Campaigns” option in the top menu. Then, from the left-hand menu, select either “One-time Campaigns – Audiences for Advertising Networks” or “Automatic Campaigns – Audiences for Advertising Networks.”
Both options have different behaviors:
• One-time Version: The audience is sent once and remains static over time. • Automatic Version: The audience is continuously synchronized with selected advertising networks, making it ideal for cases where contacts in your lists change over time.
From this screen, you can click “Add Account” to connect an existing Sklik account. You’ll need to provide your login name (email) and API key, which can be found in your Sklik settings. When adding a new account for the first time, it is necessary to approve email lists directly in the Sklik interface. Simply click on “Settings” in the Sklik (Sklik.cz) interface.
Then select “Retargeting” from the menu, and click the green “Create a Retargeting List” button. Next, in the “List Type” section, select the “Email” option, which will trigger a pop-up window for agreeing to the terms and conditions. Once the consent is checked and confirmed, you can proceed with creating new audiences in Incomaker, and any previously created “Email Lists” will also be displayed if they exist.
Once successfully connected, your account will appear in the “Account” field. If you need to add more Sklik accounts, repeat the “Add Account” process. You can then switch between accounts in the “Account” dropdown as needed.
Once your account is connected, select it. If you want to create a new audience in Sklik, give it a name. The selected audience will appear under “Audience in Advertising Network.” You can also choose from existing audiences already uploaded to Sklik. NOTE: Existing audiences will be overwritten. For automatic campaigns, you can also set a campaign dispatch time or choose to send it immediately. Once everything is set, proceed to the next step by clicking “Next.”
In the following section, you can decide which audiences to upload to Sklik, create new ones, or filter and add specific contacts. If your lists are dynamic and you’re using an automatic campaign, contact synchronization with the audiences will occur regularly.
In the final step, you’ll see a “Summary” screen. Click “Save” to complete the process.
• For the one-time version, the audience will be uploaded, and the campaign will move to the completed campaigns section. • For the automatic version, which continuously synchronizes, the campaign will remain in the “Ongoing” section.
Do you want to better target your advertising campaigns and increase your chances of conversions? To achieve this, Incomaker has introduced the option to share audiences with Facebook (Meta), enabling you to reach specific user groups.
How to do it?
Start by clicking on the “Campaigns” option in the top menu. Then, from the left-hand menu, select either “One-time Campaigns – Audiences for Advertising Networks” or “Automatic Campaigns – Audiences for Advertising Networks.”
Both options have different behaviors:
• One-time Version: The audience is sent once and remains static over time. • Automatic Version: The audience is continuously synchronized with selected advertising networks, which is useful when contacts in your lists change over time.
Click on the Facebook logo. In the “Account” and “Advertising Account” fields, you can switch between accounts as needed.Once your account is selected, enter its name. The selected audience will appear under “Audience in Advertising Network.” You can also choose from existing audiences already available in Facebook. NOTE: Existing audiences will be overwritten. For automatic campaigns, you can set a campaign dispatch time or choose to send it immediately. Once everything is set, proceed to the next step by clicking “Next.”
In the next section, you can select which audiences to upload to Facebook, create new ones, or filter and add specific contacts. If your lists are dynamic and you’re using an automatic campaign, contact synchronization with the audiences will occur regularly.
In the final step, you’ll see a “Summary” screen. Click “Create” to complete the process.
• For the one-time version, the audience will be uploaded, and the campaign will move to the completed campaigns section. • For the automatic version, which continuously synchronizes, the campaign will remain in the “Ongoing” section.
“If I see ‘0’ in the ‘Spam’ column of my campaign report, does that mean there were truly zero spam issues? I ask because another campaign shows 6, and I want to understand if this information is accurate and how it can be verified.”
This number represents the count of user-generated spam complaints.
Most email services (like Gmail, Outlook, etc.) have a “Mark as spam” button. When a recipient clicks this button on an email sent from our platform, the email service informs us through a feedback loop. We then record that action in your report. This number is therefore a direct count of these actions.
It’s important to note that some recipients use the “Mark as spam” button as a way to unsubscribe from future mailings instead of using the proper unsubscribe link. Email service providers are aware of this behavior and take it into account in their statistical analysis.
However, this number does not show how many emails were automatically filtered into the spam folder by an email service’s algorithm without any user action. An email can be delivered directly to the spam folder without being “marked as spam” by the user, and that event is not captured by this specific metric.
One of the requirements of email marketing is the need to allow customers to unsubscribe from email or SMS campaigns. Incomaker handles this requirement automatically: it checks whether an unsubscribe link is present in the template and adds it if necessary.
However, sometimes you may not want to unsubscribe a customer from all campaigns. For example, you may want to offer the customer the option to unsubscribe only from certain lists, ask them a question before unsubscribing, and so on. In such a case, it is possible to connect virtually any functionality to the unsubscribe process instead of the standard one.
Let’s say we want to direct the customer to a landing page where we give them the option to unsubscribe from SMS campaigns.
First, it is necessary to prepare the landing page to which the customer will be directed when they click the unsubscribe link.
You can do this in Campaigns, General Landing Page:

Name it as needed:

In the next step, create the page you need. It may contain a form, links to other pages, and so on. Probably the simplest option is to create a page with a Confirmation Button that performs the actual unsubscribe action. Alternatively, you can select such a template from the library and modify it further. We will continue using this approach.
You can edit the template in the usual way. The template can be configured so that one part is visible normally immediately after loading, and after clicking the button it is redrawn.
This part is visible only before the click:

And this part is visible after the click:

Don’t forget to fill in the page name, then you can continue by clicking Next.
On the next page, there are many options, but for now we will only be interested in these two:
You can set any name you like for the event that occurs after the button is clicked. We will work with it in the next step.
You can copy the landing page URL. Then simply insert it into the unsubscribe SMS (don’t worry, it will be automatically shortened before sending).
After that, simply click Save and Exit.
One final step remains: configuring what should happen when the event occurs. Let’s say we want the corresponding contact to be added to a mailing list.
Create a Mailing List Change Trigger Initiated by an Event:

Give the trigger a name of your choice and select from the list the event that you created in the previous step:

You can also configure many additional parameters, such as a time delay and other conditions. For the sake of simplicity, we will keep it so that the event is executed immediately without any additional conditions.
Then all that remains is to define what should happen to such a contact:

In this example, the contact will be added to the unsubscribe list and at the same time removed (red button – double click) from the E-shop customers list.
Don’t forget to click Save and Exit.
Do you use a filter repeatedly and get tired of setting it up over and over again? That’s exactly what you can use audiences for in Incomaker! Unlike static mailing lists, an audience always contains an up-to-date selection of contacts at the moment you use it (for example, when sending a campaign to it).
Create an audience
The easiest way to set up an audience is in Bulk Edit under the Contacts tab:

Here, you can set the conditions as usual, fill in the Audience Name field, and confirm by clicking the Create Audience button:

You can find your newly created audience on the left in the list of audiences, and you can use it in both automated and one-time campaigns:

What is the difference between each contact source?
IMPORT_FEED – Imported from a contact feedIMPORT_FEED_ORDER – Imported from an order feedAPI – Added via APIDIALOG_POP – Collected from pop-ups and formsIMPORT – Added via manual import
Log in to your e-shop’s Customer Administration. In the left-hand menu, expand the Marketing category and select Discount Coupons.
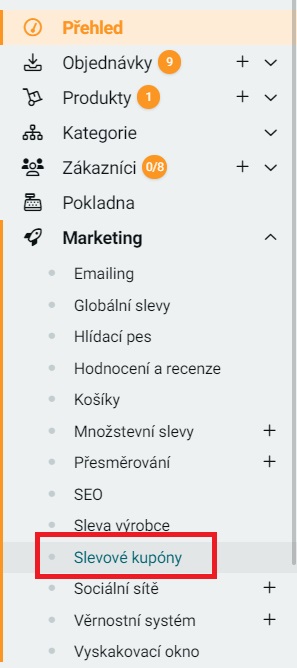
Generating Discount Coupons
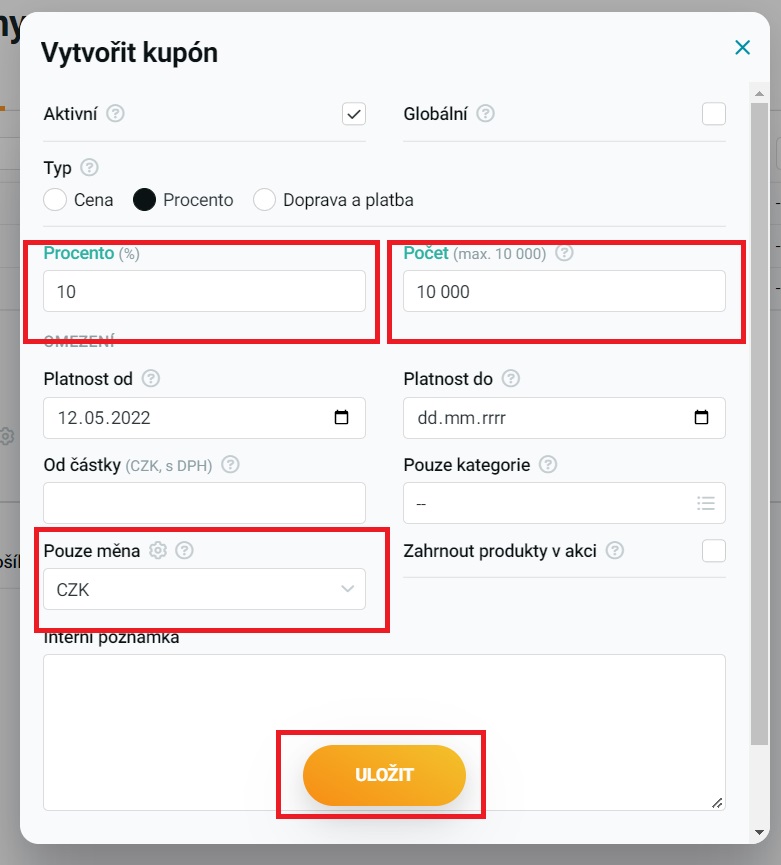
Click the New button, and a dialog window will open where you set the coupon parameters. There are two most important things here — fill in the Quantity field and select the correct currency. You can set the other parameters however you see fit, but for a holiday-coupon campaign we recommend generating as many coupons as possible (in Upgates the maximum is 10,000) and not setting an expiration date (because we’ll be sending them out gradually, and a fixed expiration date would cut that short). Conversely, if you’re running something like a weekend promotion and send the coupons all at once in a single campaign, it’s better to set an expiration date. If you want each coupon to be redeemable only once, do not select the Global option.
Once you’ve set the parameters, click Save.
Next, in the Add-ons – API section, click the pencil icon next to Incomaker and, for discount coupons, select read and write — see the screenshot.

That’s all — the coupons will be generated, we’ll automatically download them into Incomaker, and all you need to do is insert the email variable for discount coupons into the relevant email template.
Log in to the e-shop Administration. In the left-hand menu, expand the Marketing category and select Discount Coupons.
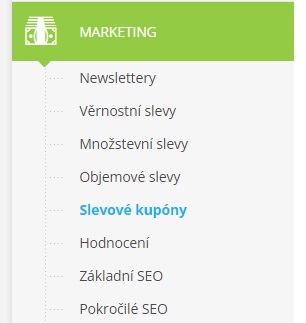
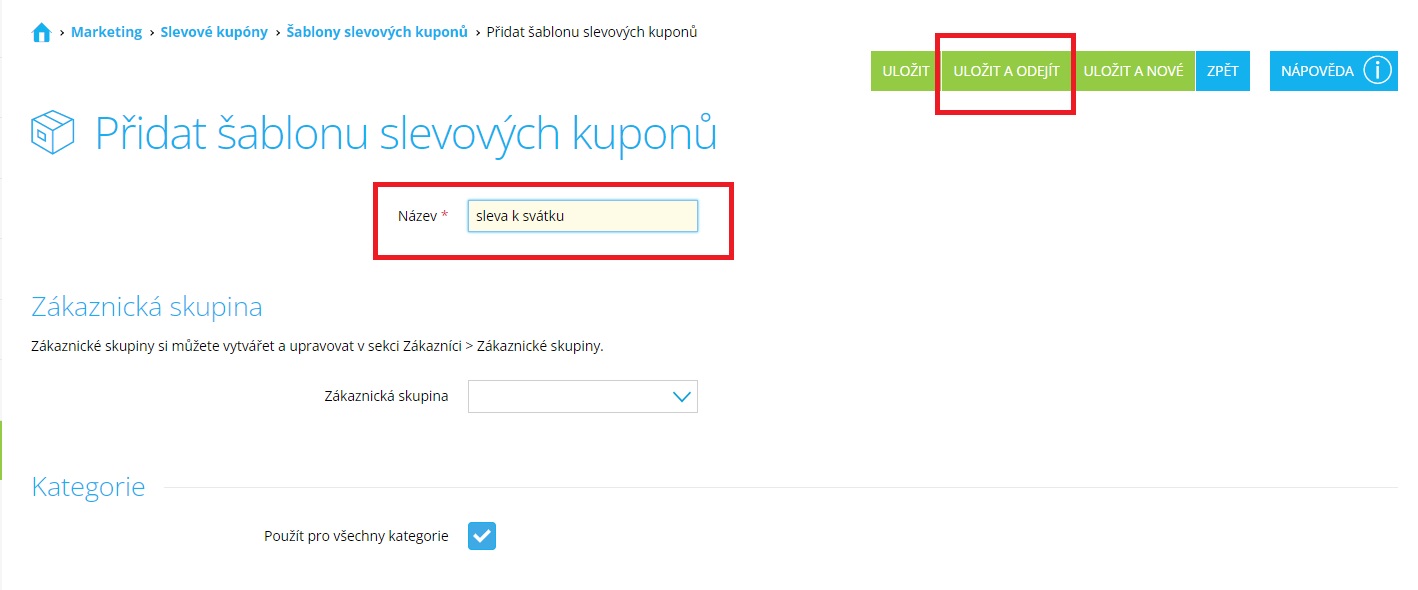
Creating a Discount Coupon Template
If you want to use discount coupons in Incomaker for multiple campaigns, it is a good idea to generate each set into a separate coupon template. In the Templates tab, click the Add button.
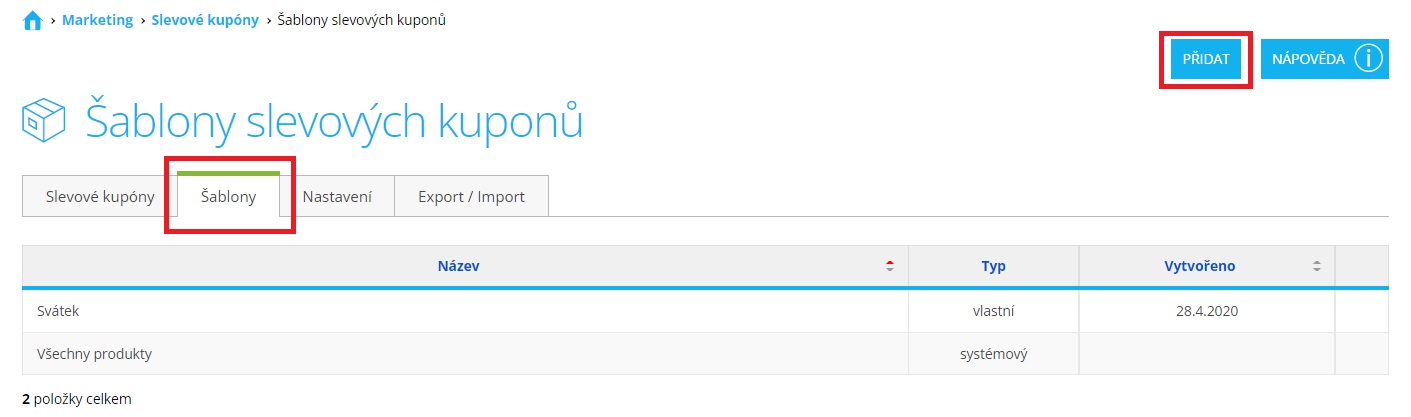
The most important field to fill in is Name – this is the name under which you will find the corresponding coupon set in Incomaker.
You can also configure additional parameters, such as whether the coupons in this set should be valid for products in all categories or be available only to specific customer groups.
Once you have configured the desired settings, click Save and Exit.
Configuring Coupons Generated Through Incomaker
The advantage of this setup compared to generating coupons in Shoptet is, for example, that the number of generated coupons is not limited to 999, so you can also send large campaigns with discount coupons.
Another advantage is that we request coupon generation at the moment the campaign is sent, which makes it possible to set the validity of the discount code even for holiday campaigns or campaigns that react to an event (typically sending a discount code after subscribing via a pop-up).
In Incomaker, click the gear icon, select General Settings, and then go to Coupons. Stay in the Coupon Types tab.
We take coupon names from Shoptet, so you will find, for example, a coupon such as “birthday discount”. Coupon updates from Shoptet usually happen overnight, so if you cannot find a coupon type that you created in Shoptet, either wait until the next day or contact support, where they can refresh it manually.
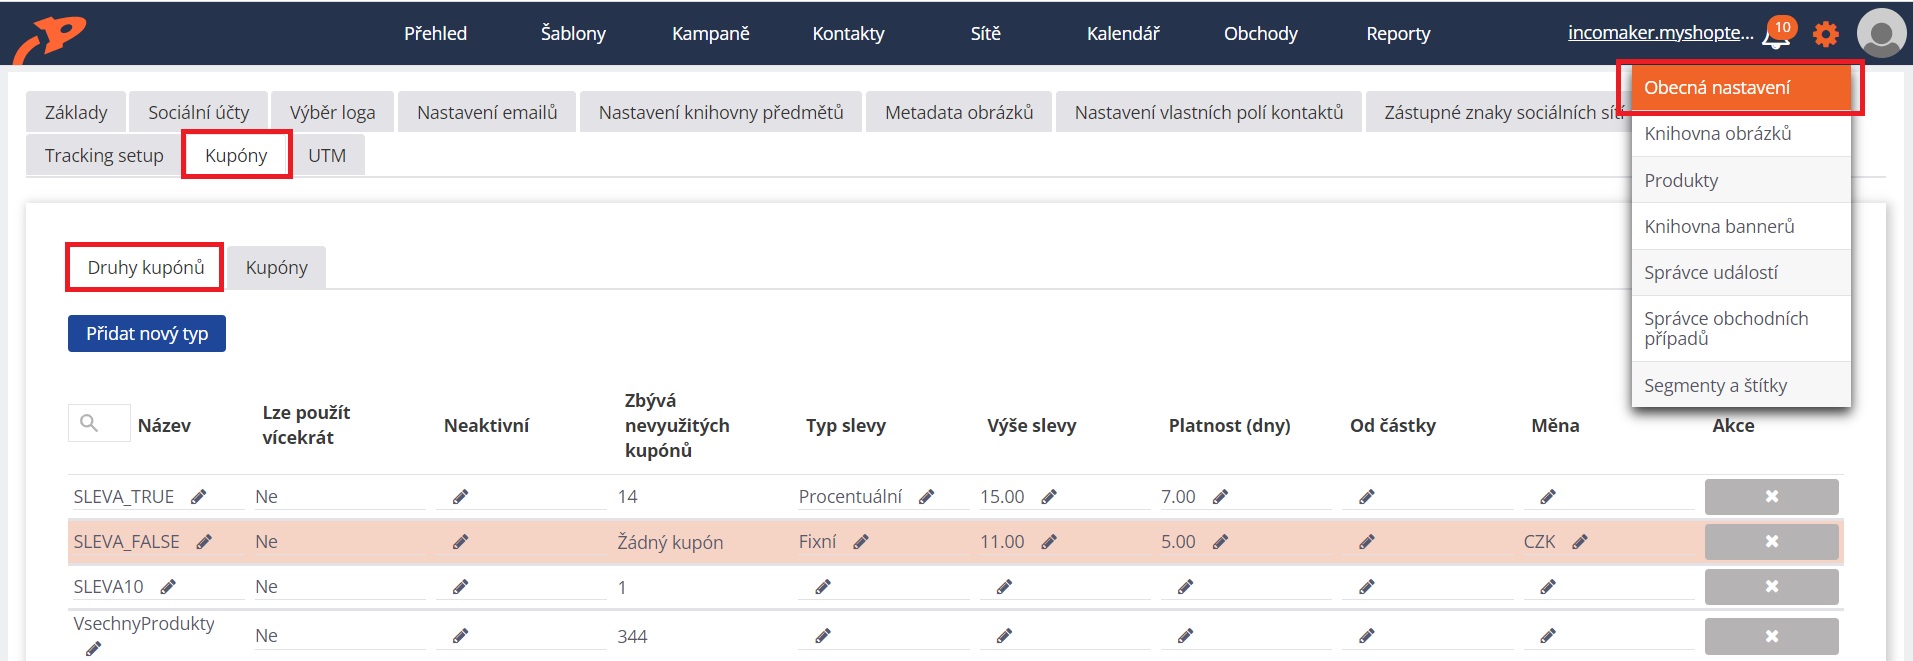
Here you set the discount conditions in the same way as in Shoptet. It is mandatory to select the Discount Type and the Discount Amount. If you choose a Fixed discount type, you also need to select the currency. Once everything is set up, you simply need to insert the email variable for discount coupons into the relevant email template and set the campaign to be sent.
Generating Discount Coupons in Shoptet
Go back to the Discount Coupons tab and click the Add button.
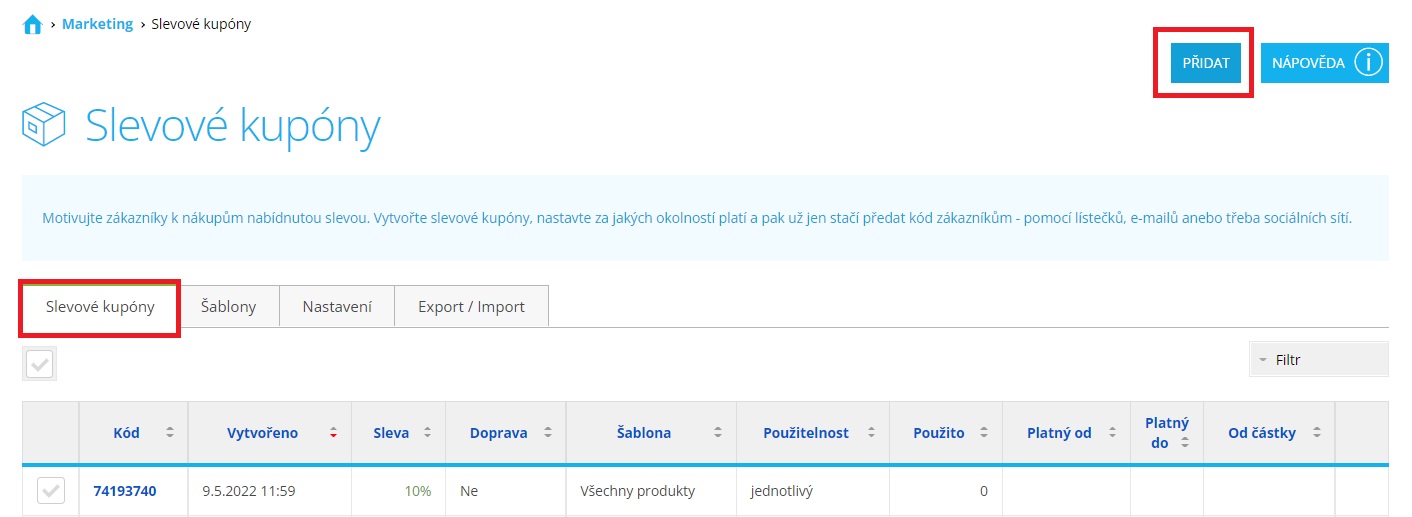
Here the two most important things are: select the option Add multiple coupons and choose the corresponding template name from the Template dropdown. You can set the other parameters as you see fit, but for a campaign such as a birthday discount coupon, we recommend generating as many coupons as possible (Shoptet allows a maximum of 999) and not setting an expiration date (since the coupons will be sent out gradually and the validity would otherwise be tied to a specific date). On the other hand, if you are running, for example, a weekend promotion and sending coupons all at once in a single campaign, it is better to set an expiration date. If you want each coupon to be redeemable only once, do not select the Multiple use option.
Once you have configured the parameters, click Add.
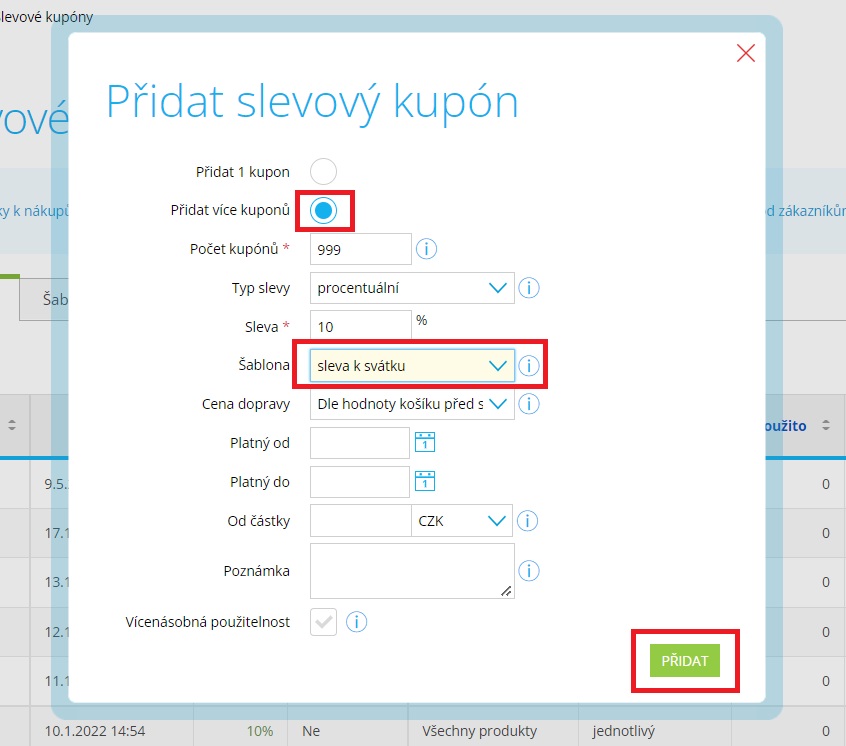
That’s it, the coupons will be generated, we will automatically download them into Incomaker, and all that’s left for you is to insert the email variable for discount coupons into the relevant email template.
Since Shoptet limits coupon generation to a maximum of 999 coupons, sooner or later you will need to generate new ones; otherwise, the campaign in Incomaker will stop working. Once there are only 50 coupons left that can be sent, you will receive an email notification informing you that you need to generate additional discount coupons and indicating which campaign is running low. You can generate them again simply by repeating the steps under Generating Discount Coupons.