Initial steps with Incomaker include a number of settings and running basic campaigns. Here’s an overview of each step, which should ideally follow one after the other:
Creating an Incomaker account
Signing up for a new Incomaker account is easy – just click “Start for Free” on the https://www.incomaker.com/en website, as Incomaker in its basic form is completely free to use.
E-shop details
In the e-shop settings, fill in as much detail as possible about the e-shop and other details, including the company logo. As these details are further used in the system, it will simplify many of the next steps as they will be automatically filled in at important points.
Connecting your e-shop
Thanks to the wide range of possible integrations of existing e-shop platforms, connecting Incomaker to your e-shop is quick and easy. An overview of supported platforms for automatic connection can be found in the Getting started – Integration – E-commerce platforms.
If you have an e-shop on another platform that is not listed, just contact us and we will connect you manually. We can adapt to any e-shop solution.
DNS settings
DNS and proper setup is a critical part of linking, as it is required to send out emails under your domain with your e-shop name. For the exact procedure, please see the Getting Started – Integration – E-commerce platforms, where samples of popular domain registrar interfaces are also available.
You can then simply check that everything is set up correctly in DNS directly in Incomaker.
Importing contacts
Incomaker will automatically load the main feeds with contacts (customers of your e-shop), products and orders when connected to e-shop systems. If you have other contacts somewhere else that you want to add to the database, it is advisable to do it in this step, i.e. before the first mailing. You can find everything about contacts in the Contacts section.
Creating templates
At this stage it is advisable to start creating templates. You can choose from a variety of our templates, which can be modified as needed with Editor or you can create a completely new one. If you want us to create a professional and fine-tuned template for desktop and mobile devices, just contact us.
Intelligent Campaign
The first thing to do is definitely to set up a intelligent campaign, which, once set up, will work completely automatically and will also intelligently populate personalised products in the emails sent to each individual customer. How to set up a intelligent campaign can be found in the Features – Email distribution section.
Abandoned carts
An important feature for increasing e-commerce conversions is the abandoned cart feature. To learn how to set everything up, see the Abandoned Carts article in the Campaigns – Abandoned Carts section. At a later, more advanced stage, you can also focus on abandoned cart rescue via social media.
Connecting social networks
Incomaker allows you to manage your social networks from one place and also set up automatic generation of posts that will reflect, for example, a selection of products that are currently on sale and so on. To find out how to connect your social networks, see Getting started – Integration – Social Networks.
Nameday and birthday campaign
An automated campaign for customers who have a nameday is an important part of any e-commerce store’s marketing mix. You can find out how to set up nameday campaigns in Features – Email distributions. Then in the same section there is a guide to birthday campaigns.
Pop-ups
Pop-ups are another way to communicate with unknown users on the e-shop, but also with existing logged-in users. The standard use is a Call to First Purchase. You can read tips on how to work with pop-ups on our blog.
© 2026 Incomaker Support
Your Logo is Critical to Your Brand
Your logo is a key factor of your marketing efforts. The logo is the anchor of your brand and what people will remember when they think of your company. Incomaker allows you to easily insert your logo into any content you send out.
How to Add Your Logo to Incomaker
You can add a logo by selecting the gear icon and clicking on Basic settings.

On the Basic Settings page, click on the Select Logo box. On the Logo setup page, click the Upload Image button to browse your computer for your logo file. Select your desired image, and then click on the Confirm button to finish setting up your logo.

Increase Incomaker’s Efficiency by Adding Your Company’s Details
Adding your Company’s specific details makes Incomaker more efficient. You will be using this information on almost all of your marketing campaigns. By adding this information, you won’t have to keep manually entering it. Instead, you will be able to simply drag and drop this information into your content.
How to Add Your Company’s Details to Incomaker
To add your company’s details to Incomaker, select Campaigns and then click Fill in company details.
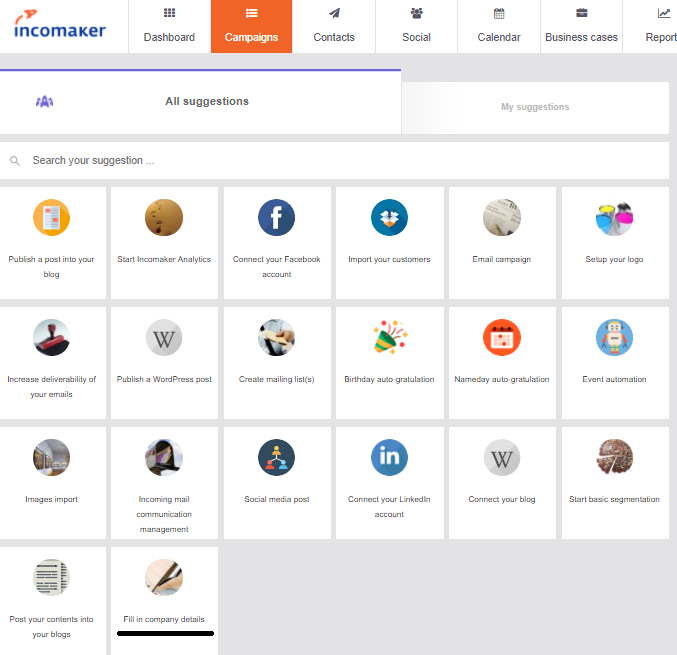
You will be directed to a page to enter your contact information. Click complete when you are finished entering your details.
Structure of the e-mail
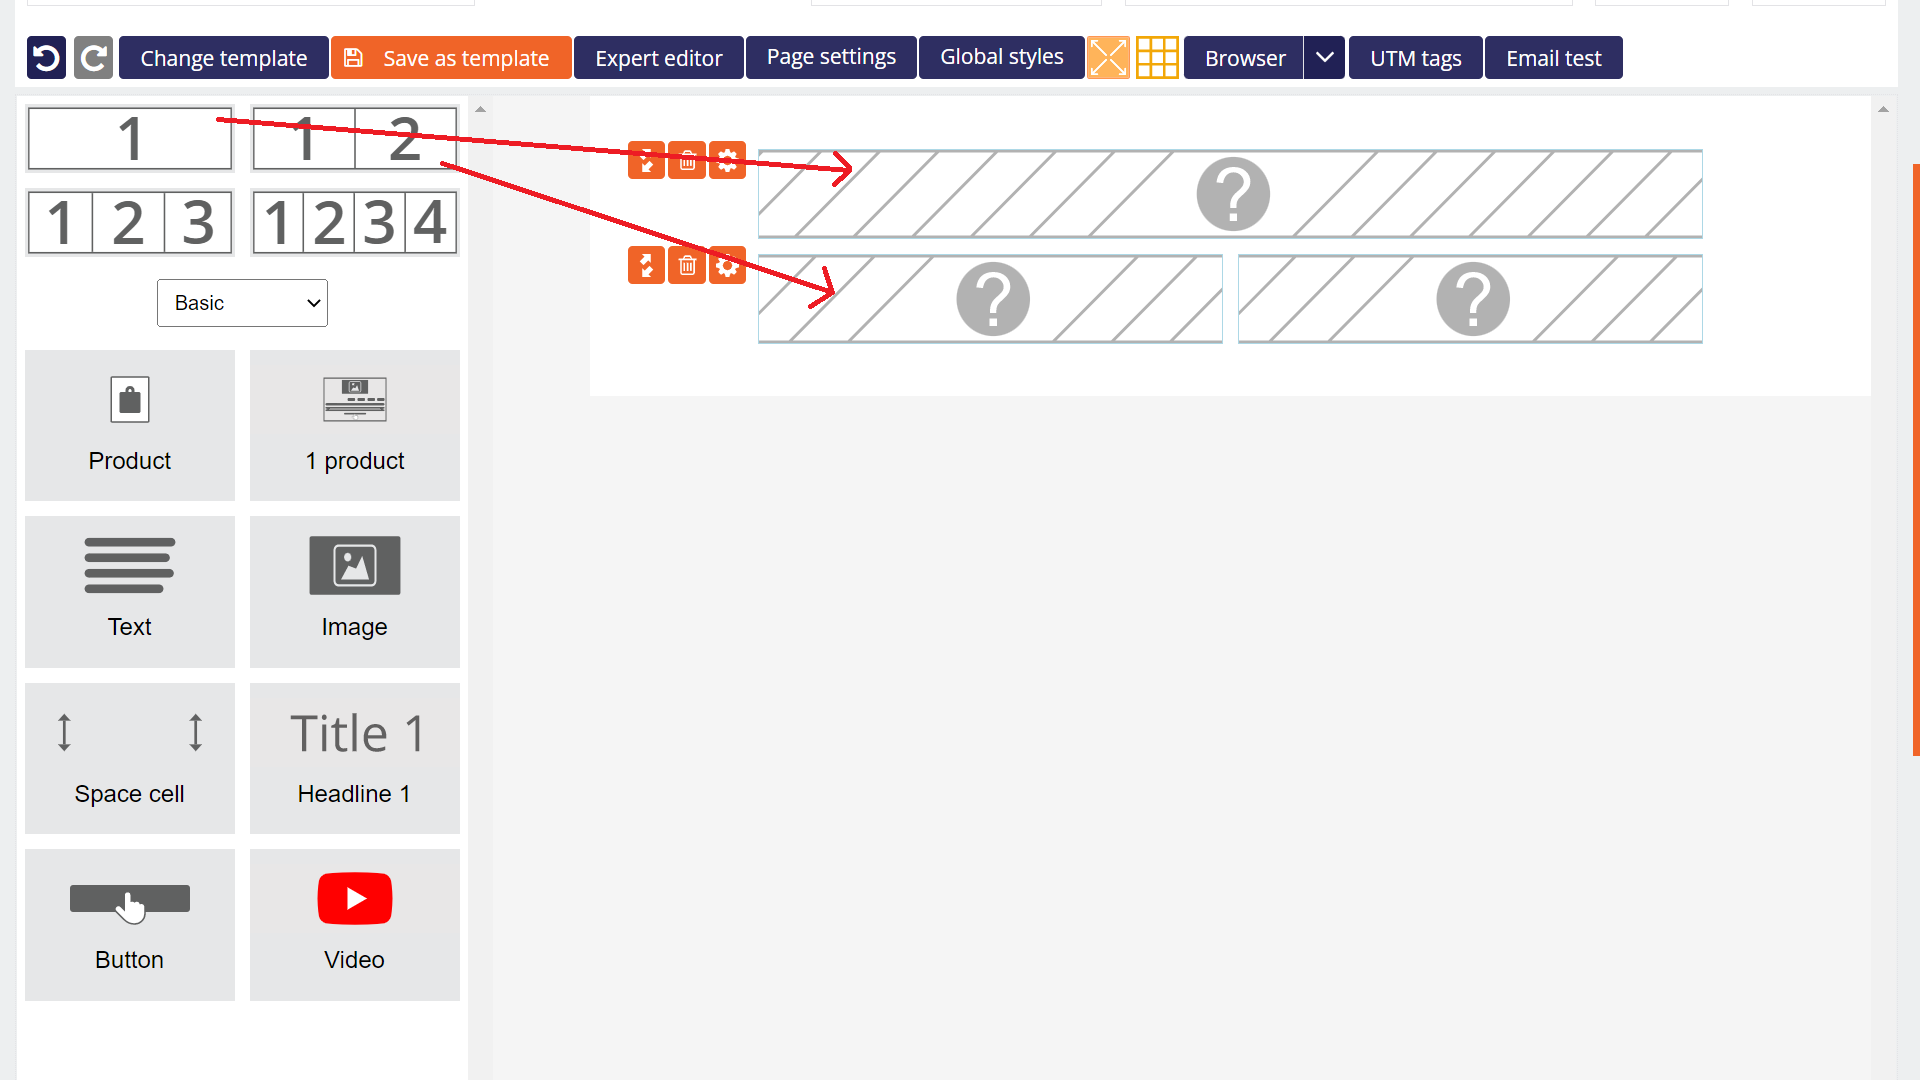
First, prepare the structure of the email by dragging the blocks with the number of columns into the editor. For example, you want the email to start with a logo and have an image below it and text with a button next to it. So drag a block with one column first and two columns below it into the editor.
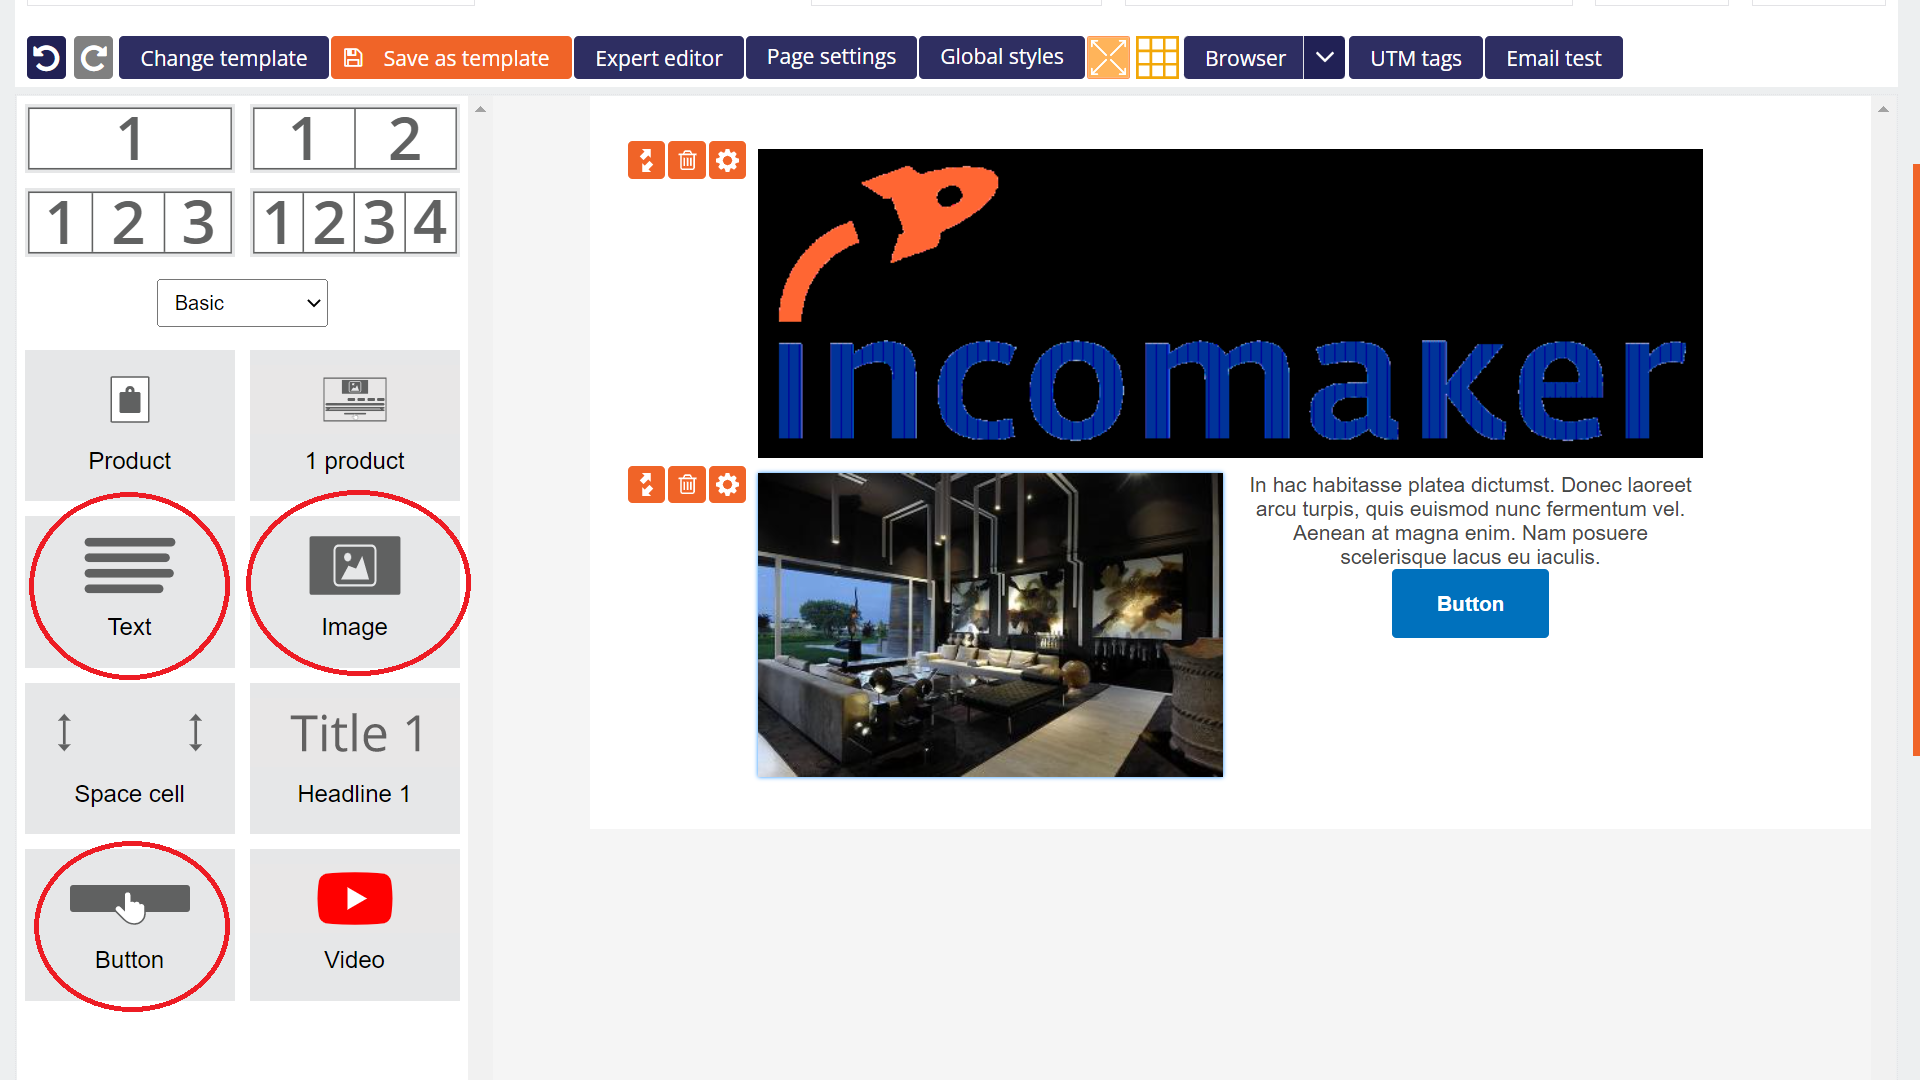
Insert the desired components into the individual blocks.
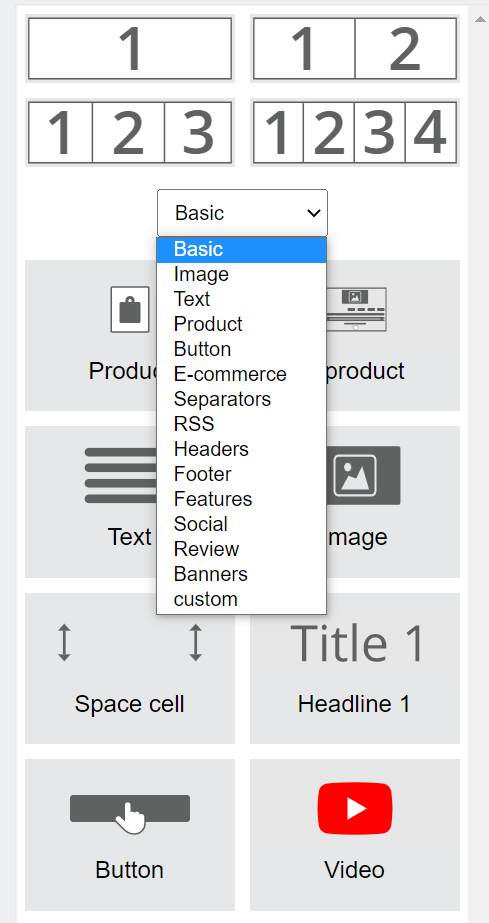
For clarity, the components are categorized. In the basic category you will find basic components such as text, button and image. The logo can be found in the header category and in the image category we have prepared whole lines for you – for example, two images side by side and two buttons below them.
Change the image
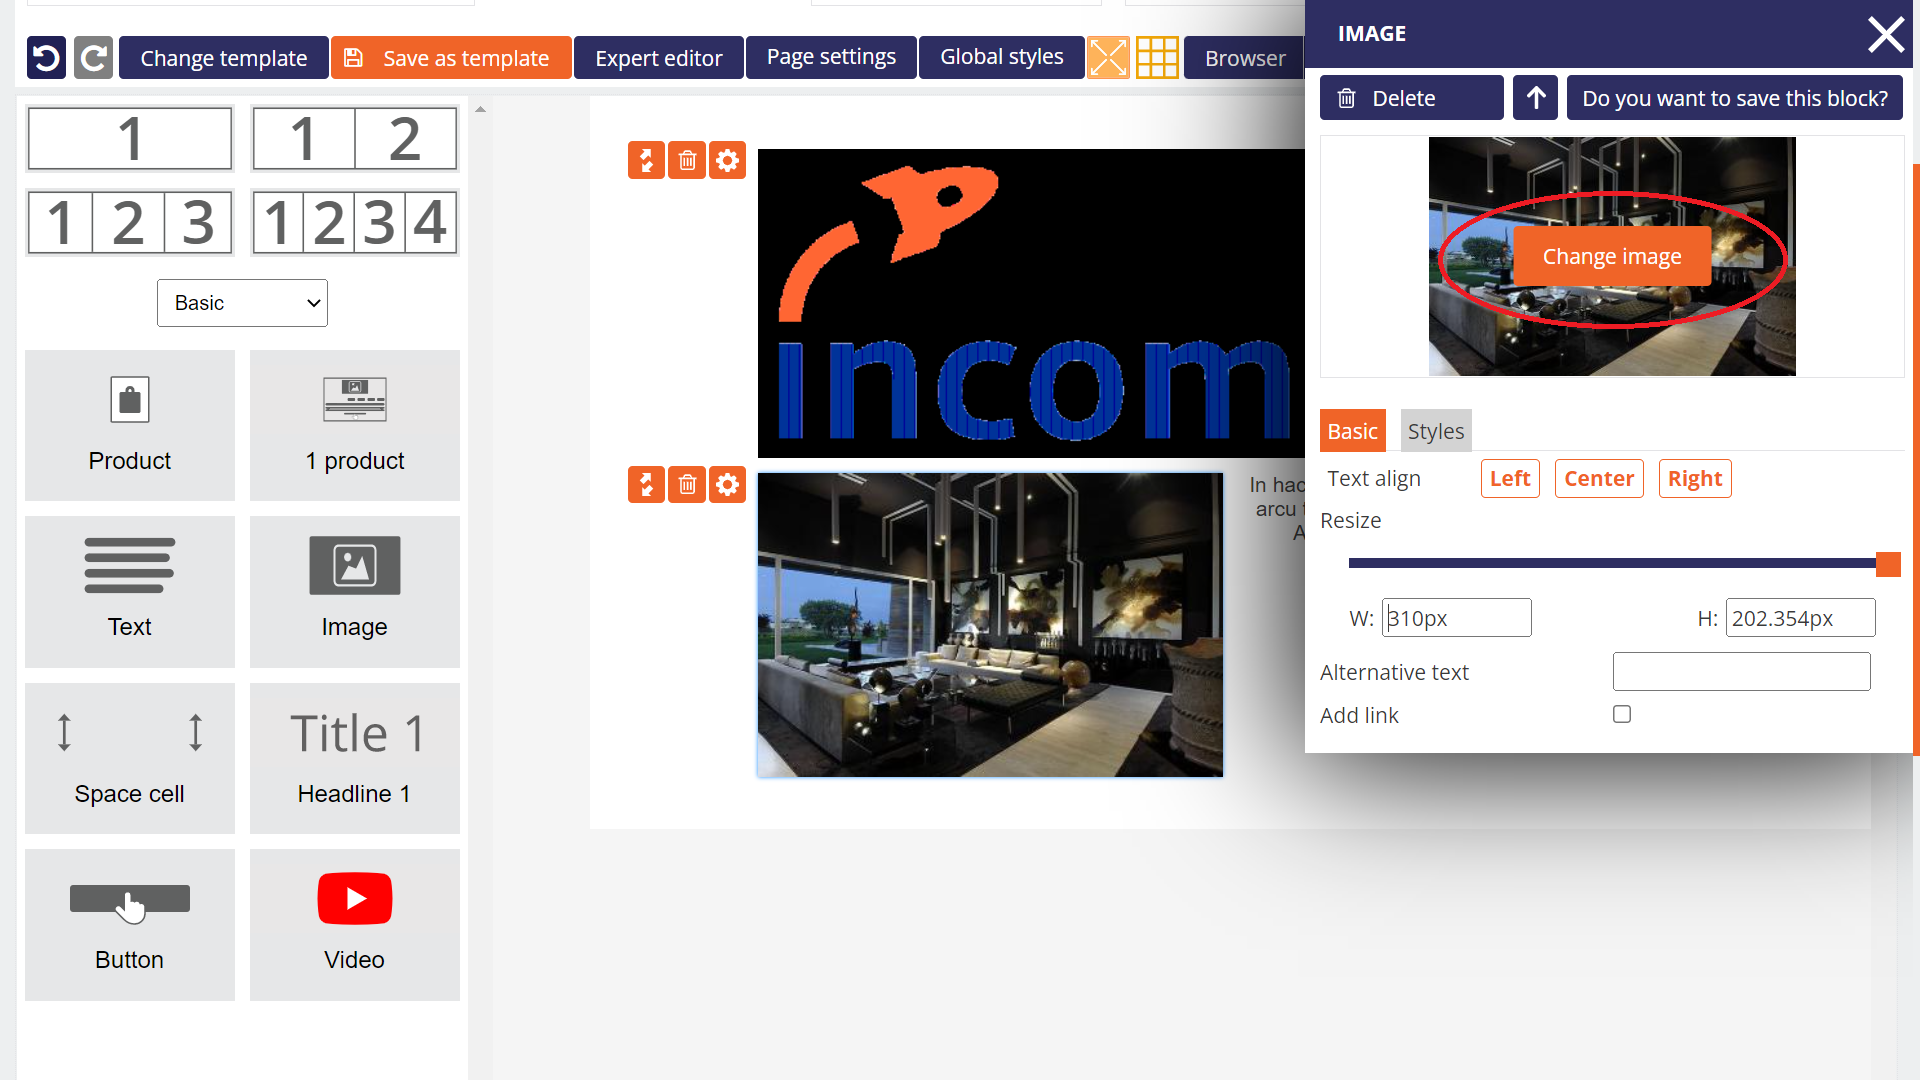
If you want to replace an image that is already embedded in the body of the email, click on the image to open the image settings dialog. Click the Change Image button and Incomaker will show you a menu of images you have saved or upload new images via the Upload Image button.
Insert personalization
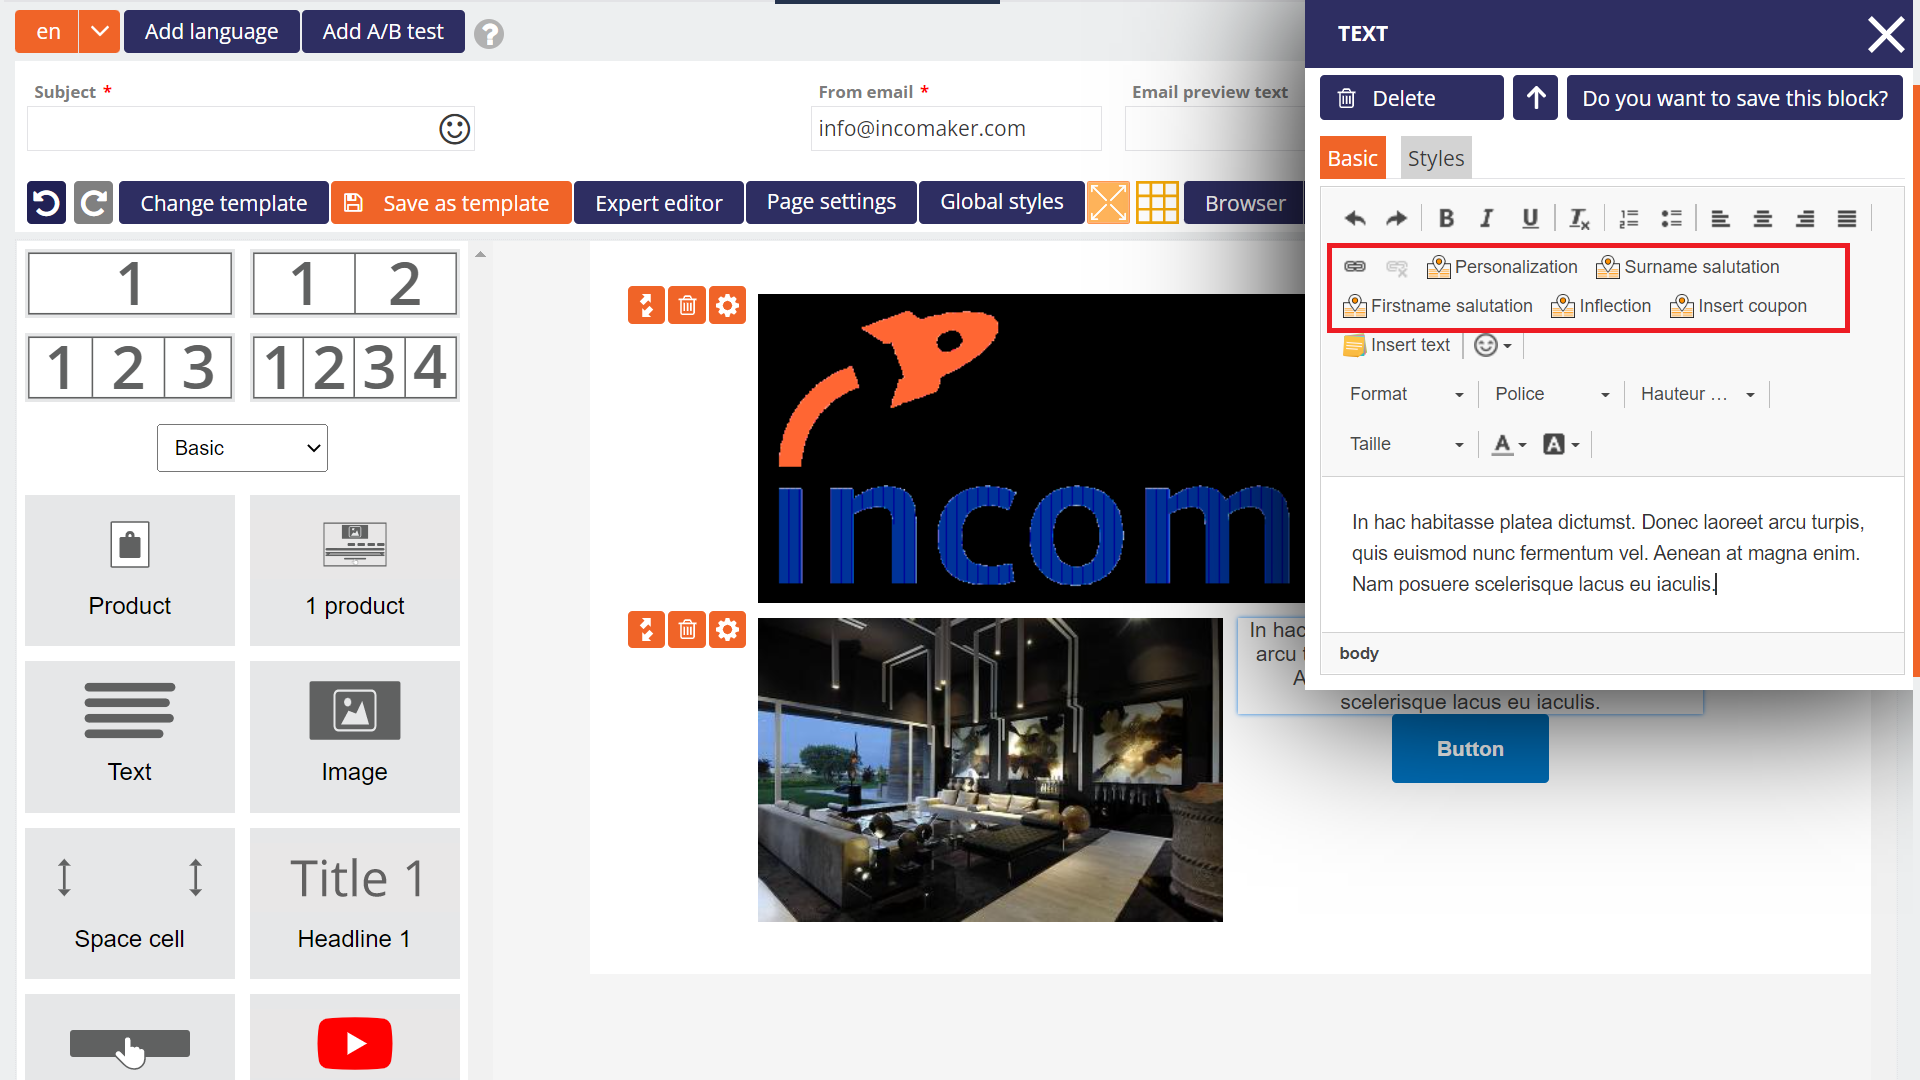
If you need to insert elements that should be personalized in the email depending on who the email is going to, such as the salutation, click on the Personalization icon in the menu and select which fields you are interested in. For example, salutation, company name, etc. Incomaker then adds the content to each unique customer individually when sending, so the emails look as if you wrote them by hand.
More detailed instructions can be found in the Substitute Texts article.
Inserting dynamic content
Incomaker can easily handle very advanced personalization of mail content. This functionality is called dynamic content and is inserted in the editor via special elements that ensure the addition of specific content to individual mails. In the component categories, you select Ecommerceand choose from ready-made automated blocks. You drag and drop this into the prepared one-column structure in the mail. A dialog will open with the dynamic content settings and you select the number of items (products) to be added. If you want to send 4 products, you insert one block and write 4 in the number of items field. Next, you select whether you want to send fully personalized content (choose the Smart Product Recommendation option) or, for example, News or Products in Action. Finally, select the currency and save the settings for the block with theConfirm button.
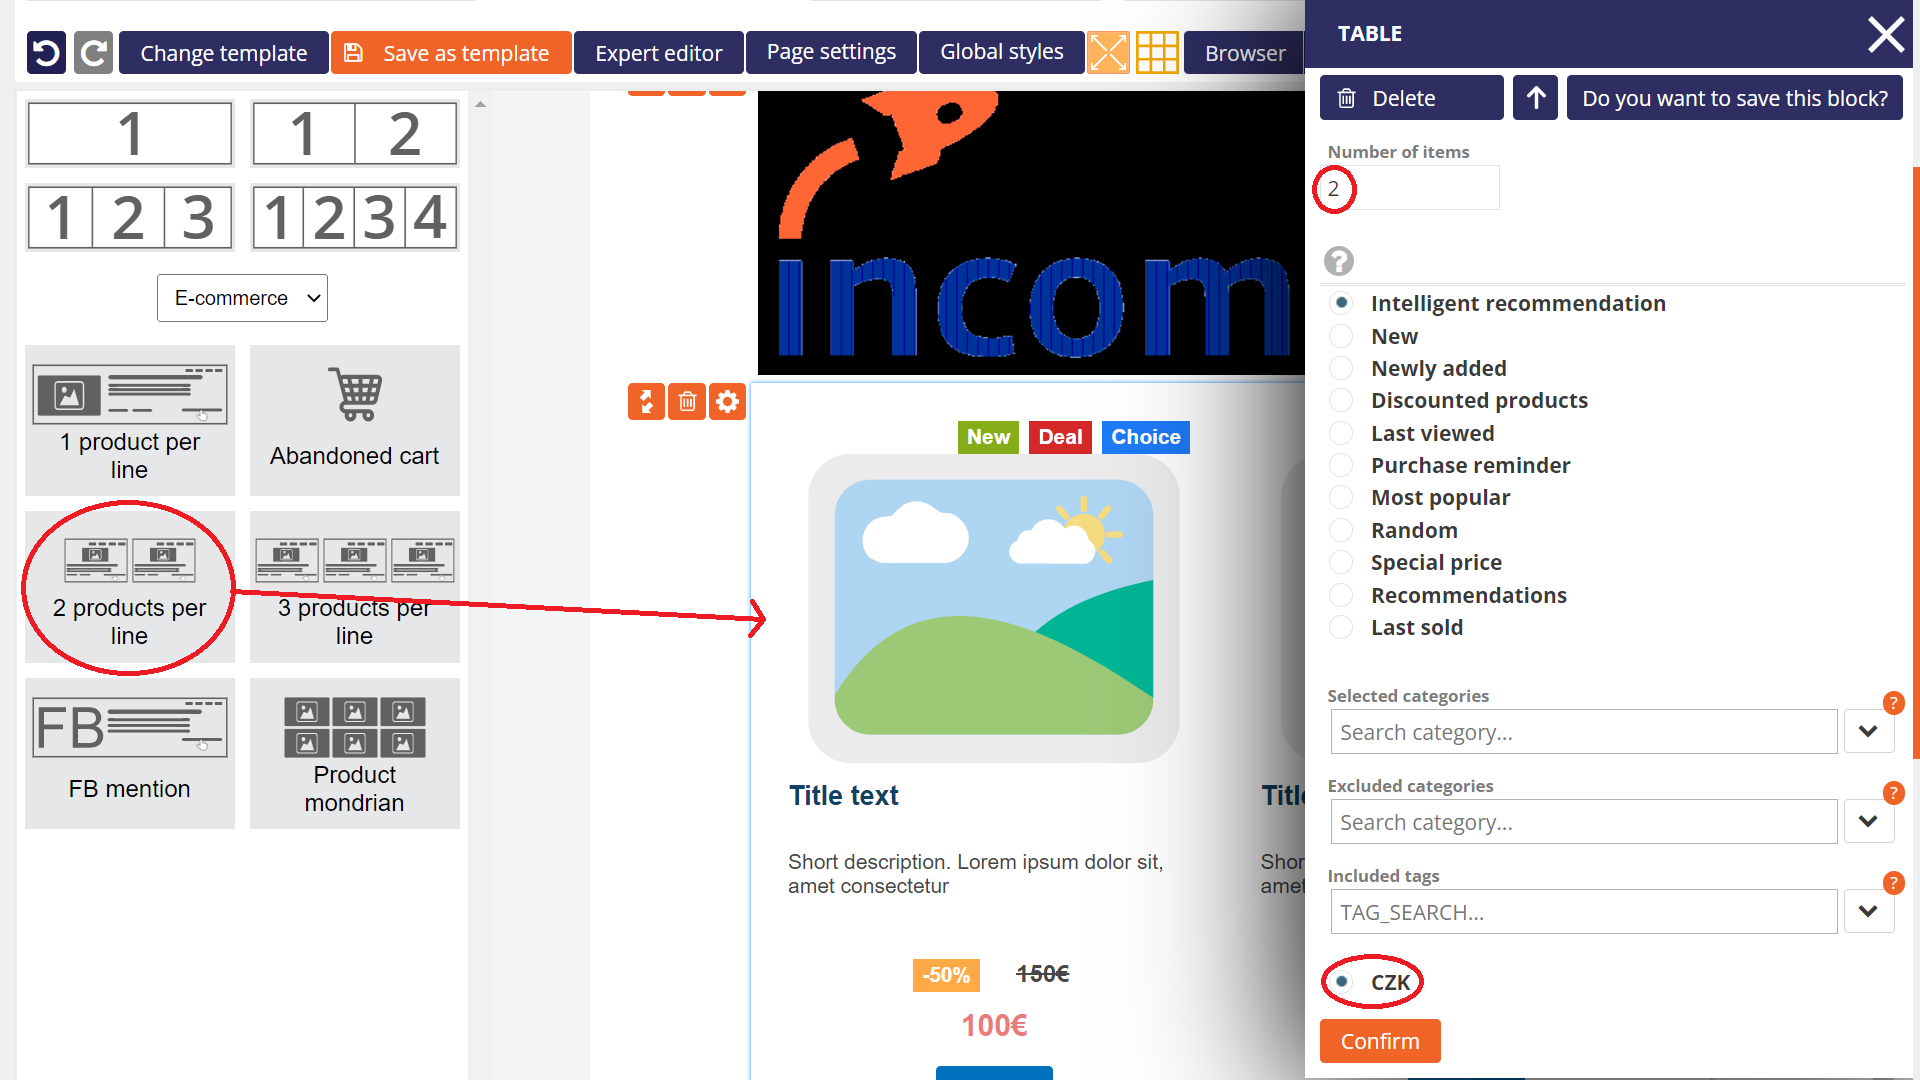
When sending the email, the appropriate content (images, product names, etc.) will be added. According to your preferences, you can change, for example, the font colour, buttons, font size, etc.
Editing dynamic content
If you need to change what Incomaker should add to the dynamic content, click anywhere in the element and the dynamic content editor opens immediately
In the Dynamic Content dialog you can set how many items (products) should be displayed in the mail, or you can modify the product selection criteria. Nothing prevents you from having more Dynamic Content elements in the email and your email can then look like it first contains a selection of news (News) followed by an article from your blog (Smart Article Recommendation) on the topic and finally an offer of several products relevant to the customer (Smart Product Recommendation).
It would be a shame to lose a customer who doesn’t complete a purchase. Often the situation can be saved. Incomaker makes it very easy to set up campaigns to bring the customer back. The simplest is an abandoned cart campaign that notifies the customer by email. However, simultaneous engagement with Facebook advertising through Facebook audiences has a better effect.

The customer puts the item in the cart but does not complete the purchase. Within 30 minutes, they will receive an email reminding them of the item they have placed in their basket and prompting them to complete the purchase. If he doesn’t respond, 18 hours later the purchase reminder will start appearing on his Facebook page. In 24 hours, he will receive a second reminder email (it may include a coupon for a discount). After 30 hours, another, more urgent message will start appearing on his Facebook page. If the customer still doesn’t complete the purchase, after 5 days it will stop appearing.
If the customer completes the purchase at any time in the interim, the entire campaign is terminated and the emails and Facebook ads are no longer shown.
This whole complicated scenario can be set up in Incomaker literally in a few clicks.
Setting the 1st (fast) abandoned cart
In the Campaigns tab, click on Abandoned Cart to start the setup wizard.

In the first step, you set the name of the campaign and how long you want to send the email to the customer after the item has been added to the cart. The default is an hour, which is the ideal time to send a quick cart abandonment. You can also set a specific customer to receive the cart only once within a certain time interval. In this case, check the Send maximum once per option and fill in the time in days. If the customer shops with you more regularly, then they can’t be bothered by too many emails.
There are many more details that can be set up for an abandoned cart in Incomaker, see the article on abandoned carts for more details.

Setting the 2nd (slow) abandoned cart
Click on Abandoned Cart again in the Campaigns screen and create a second event in exactly the same way. The only difference will be the time. The second email cart is often sent after 24 hours. Consider motivating the customer to buy in some way, perhaps by offering a discount coupon.
You don’t have to worry about linking to the first event or any link to the purchase, Incomaker will take care of that for you.
View reminders on Facebook and Instagram
Some customers don’t read emails much, but it can work for them if we show them a reminder to buy a product in the form of a Facebook ad. Facebook offers the possibility to target advertising to differently defined user groups (audiences). Incomaker allows you to automatically insert relevant contacts into such circles. If Facebook recognizes the contact, it starts showing the customer the relevant ad – a reminder of the purchase.

The setup is extremely easy. In Campaigns, click on Abandoned Cart for Facebook and Instagram

Select the circuit where we will insert the contact. This should then be linked in Facebook business manager to the relevant ad you want to show the customer. Name your campaign something.
Select a social media account that you have linked to Incomaker. If you don’t have an account linked, you can connect it e.g. on the Networks tab. The account(s) for the ad that you have linked to the account in Business Manager will be automatically picked up. Select the account(s) for which you want to work with the user group.
Alternatively, you can create a user group. Remember, however, that Facebook’s rules do not allow ads to be displayed if the user group is too small.

Now you only need to set the interval when the customer should be added to the user circle (e.g. after 18 hours) – i.e. when the ad should start to be displayed – and when he should be removed from it (e.g. after 2 days) – i.e. when the ad should stop being displayed. It goes without saying that if the customer completes the purchase in the meantime, the contact is automatically removed from the circuit before the deadline. There is no need to set this up separately.

View second reminders on Facebook and Instagram
If the customer does not purchase the product even then, you can show them another notification. For example, add an incentive to buy in the form of a discount coupon or, conversely, turn on a less specific ad that reminds the brand. To do this, you insert a contact to another circle of users that you have ready.
You follow exactly the same procedure as in the previous step, i.e. create another Abandoned Cart for Facebook and Instagram in the Campaign. We’ll just select (or create) a different audience and set the appropriate times.

Again, we don’t have to worry about continuity. Incomaker itself arranges that if the respective customer makes a purchase, he is removed from the circles and all activities on mail and Facebook and Instagram are immediately terminated for him.
To register for Incomaker, click on the “Get Started for Free” button in the top right corner of our website.

Then fill in your email and create an account.
A confirmation email will be sent to your email address with instructions on how to set up a password to log into your newly created Incomaker account. Click the “Let’s get started” button to start the setup wizard.

Pop-ups are a great way to capture customers who have visited your website or e-shop and get in touch with them. Best of all, you can sell them something right away. And it’s a good idea to encourage them to do so. With Incomaker we can do this very easily.
Creating a pop-up window
Creating a pop-up window is described in other articles. Each popup creates an event (signal) after the user fills it in. The name of this event can be set in the popup settings. It can be named arbitrarily.

Creating an event to send a prompt
An event is what controls the actions that will happen in Incomaker. An example of an event is filling out a popup (or making a purchase, etc.). Such an event can trigger various actions, such as sending an email.
Open the Event Manager in the Settings menu (gear wheel).

Create two new events in the event manager. Click on Create New and the event setup dialog will open.
In the Resulting Event field, we will name the event something. Preferably something simple, concise. For example, 24 hours from registration. In the Time difference field, enter how much time should elapse before the event occurs, i.e. 1 day. In the current version of the interface, the time is entered in minutes. One day is 24*60 = 1440 minutes. In the Initial Event field, the event that starts the process must be selected. This is the aforementioned popup completion. For example, dialog_popup_contact_add and can be found in the list.
We want to prompt a customer who has not purchased anything from us for 24 hours, so this event we created must not occur if a purchase has occurred in the meantime. We set this up by expanding Advanced and selecting the purchase event, i.e. order_add, in the Termination event (so if a purchase occurs, we won’t send the prompt).

In exactly the same way, we can create a second event right away: a week from registration. The only difference will be the name and the length of the period. 1 week represents 10080 minutes.
Sending an email
There is only one thing left to do: if the event occurs 24 hours from registration, send the customer an email reminder. In the Campaigns tab, select Transactional emails.

Name your campaign something and select the event to send the email in the Event List. It’s the 24 hours from registration that we defined a while ago. We can skip the rest and go straight to the bottom where we’ll choose a template and click Next.

We are in the editor, where we work exactly the same way as in any other mailing.
And that’s it. Click the Finish button at the bottom to save the settings.

In the same way, we will create a second email that will be sent after a week if the customer has not purchased by then.
Setting up a campaign where Incomaker wishes a customer a happy birthday is easy. Of course, the condition is to have the customers’ birth dates stored in the Incomaker database.
Setting up a birthday campaign
In the Campaigns tab, click on Birthday greetings to start the setup wizard.
Campaign name and time
In the next step, you can set how you want the birthday card to behave. In the vast majority of cases, you don’t need to change anything and just proceed straight down to the template. If you want, you can change the time when the congratulatory emails should be sent out. You can also set a different campaign name (it doesn’t affect the functionality, it’s just for your convenience).

Campaign reach (optional)
Alternatively, you can limit the reach of the campaign, i.e. choose the labels (segments) of users you want the emails to be sent to – for example, only “VIP”. In this case, each person who has a birthday on that day must still be assigned a label or labels that you select in the Audience item.
If you don’t set the Audience, all contacts in your database that have a birthday that day (except for the unsubscribed ones) will receive a greeting card

Template
Select a template. If you don’t select one, you can build it from scratch. But in most cases, it’s easier to start with an existing template and just edit it. Click Next and you’ll be in the editor where you can edit the template just like any other email. There are placeholders present in the text that will be replaced with specific text in the result, such as a personalized salutation to the recipient. Of course, you can edit or reposition them as needed.
If you are satisfied, click Save and exit at the bottom and the campaign is active. Feel free to schedule your campaign, you can always come back and tweak it later.

With the Abandoned Carts campaign, you can remind your customers that they have items in their cart and haven’t completed their purchase.
Setting up an abandoned cart
In the Campaigns tab, click on Abandoned Cart to start the setup wizard.

Name and time
In the first step, you set the name of the campaign and how long you want to send the email to the customer after the item has been added to the cart. The default is an hour, which is the ideal time to send a quick cart abandonment. You can also set up multiple abandoned carts, named differently and triggered at different times or targeted to different audiences. You can also set a particular customer to receive a cart only once in a specific time interval. In this case, check the option Send at most once per and fill in the time in days.

Campaign reach
If you don’t manipulate the Advanced tab, all your subscribed recipients will receive your emails.
However, you can narrow down the targeting and select only certain segments or limit the recipients in terms of various parameters such as age, physical location and many others. You can do this by expanding the Advanced menu, where you can work with segments just like you work with them anywhere else in the system.

Template
Select a template. If you don’t select one, you can build it from scratch. But in most cases, it’s easier to start with an existing template and just edit it. Click Next and you’ll be in the editor where you can edit the template just like any other email. There are placeholders present in the text that will be replaced in the result with specific product names and images, etc. Of course, you can edit or reposition them as needed.
If you are satisfied, click Finish at the bottom and the campaign is scheduled. Don’t be afraid to schedule your campaign, you can always come back and tweak it later.


Advanced adjustments
The main element of the template is the Dynamic Content element, which you can set up or you can add more of them to the same template at the same time – for example, you can also send relevant articles that relate to the product in the product mail.

Adding another type of dynamic content
If you want, you can also add another block with dynamic content to the basket and offer the customer, for example, other products that he might like (smart product recommendation). The easiest way to add a block is to copy an existing block from an abandoned cart – this preserves all styling.

Setting up smart product recommendations
In the Dynamic Content dialog you can set how many items (products) should be displayed in the mail, or you can modify the product selection criteria. Nothing prevents you from having more Dynamic Content elements in the email and your email can then look like it first contains a selection of news (News on offer) followed by an article from your blog (Smart article recommendations) on the topic and finally an offer of several products relevant to the customer (Smart product recommendations).

In the countries of Central Europe, it is customary to wish people not only on their birthdays, but also on their namedays. The advantage is that you don’t need to know the date of birth to make a nameday wish, which is sometimes difficult to get to in terms of marketing. Incomaker can set up a nameday card campaign literally in a few clicks. Of course, it takes names directly from its database.
Nameday greeting card campaign setup
In the Campaigns tab, expand the Anniversary category and click on Nameday Greetings to launch the setup wizard.

Campaign name and time
In the next step, you can set how you want the nameday greeting to behave. In the vast majority of cases, you don’t have to change anything and you can go straight down to the template. If you want, you can adjust the time when the greeting emails should be sent. You can also set a different campaign name (it doesn’t affect the functionality, it’s just for your better reference).

Campaign reach (optional)
Alternatively, you can limit the reach of the campaign, i.e. choose the labels (segments) of users you want to send emails to – e.g. only “VIP” customers. Under Audience, you select the appropriate labels and each person who has such a label assigned and has a birthday on that day will receive a congratulatory message from you.
If you do not set the Reach in any way, all contacts in your database will receive the greeting, except the unsubscribed contacts that have their nameday that day.

Template
Select a template. If you don’t select one, you can build it from scratch. But in most cases, it’s easier to start with an existing template and just edit it. Click Next and you’ll be in the editor where you can edit the template just like any other email. There are placeholders present in the text that will be replaced with specific text in the result, such as a personalized salutation to the recipient. Of course, you can edit or reposition them as needed.
If you are satisfied, click Save and exit at the bottom and the campaign is active. Feel free to set up your campaign, you can always come back and tweak it later.
