Use Your Own Branded Link Tracking Domain
When you send emails or SMS messages, Incomaker automatically shortens and tracks links so you can see who clicked them. As a marketing platform, we provide our own link shortener for this purpose, but it is shared across all Incomaker clients. By default, your links therefore appear generic and shared with end customers.
Why Set Up Your Own Tracking Domain?
By configuring your own tracking domain (e.g., t.yourdomain.com), you gain several important advantages:
Higher Trust and More Clicks: People today are often hesitant to click on unfamiliar shortened links because they are concerned about fraudulent or malicious websites. However, when they see your own recognizable domain in the link (for example, t.yourdomain.com), they immediately know who they are communicating with. This added trust naturally encourages more users to click on your links, resulting in higher engagement and click-through rates.
Better Security and Email Deliverability Protection: When you share a generic link shortener with other users, your deliverability can be affected by their behavior as well. Although Incomaker works hard to maintain a strong reputation for all users of its shared shortening domains, no provider can monitor every activity with 100% certainty. With your own tracking domain, the reputation of your links is fully under your control, and no one else’s actions can jeopardize your campaigns.
Professional Branding Across All Channels: Your brand will be visible in every detail. Links will look clean and professional in both emails and SMS messages.
How to Set Up Your Own Tracking Domain

1. Enter your tracking domain in the Name field for both email and SMS, then click Verify Settings. The record will be saved automatically.
2. Přihlaste se do správy DNS záznamů vaší domény (např. Wedos, Forpsi, Active24) a nastavte zde:
New DNS Record Type: CNAMEName: t.yourdomain.comValue: dg.incomaker.com 3. Return to Incomaker and click Verify Settings again. The record has been successfully propagated once a ✔ checkmark icon appears in the last column.
Important: The configuration usually takes effect almost immediately, but in some cases, DNS propagation may take up to 24 hours to complete.
In the following guide, we’ll walk you through the process of setting up your e-shop’s basic information in Incomaker. You’ll learn how to easily edit your company details, billing address, and social media connections. We’ll also show you how to correctly set up stock levels so that your e-shop’s offering matches the actual availability of your products.
How to Do It
First, click your e-shop’s profile picture in the top right corner of the screen. This opens a drop-down menu, where you select the E-shop info option. In this section, you’ll find all the important information about the e-shop connected to Incomaker.

Fill in the basic details, such as your company information, billing address, and mailing address.

In this part, you can also enter your company’s social media details. We recommend filling this in now, because it automatically carries over into your email templates, saving you work when you build them later — you won’t have to enter it manually every time you add social media links to a template.

Ignore Stock Levels
After filling in this information, you’ll move on to the stock-level settings. If you want to promote only the products you physically have in stock, leave the Ignore Stock Levels option unchecked. If, on the other hand, you want customers to also receive information about products you don’t have in stock, check this option. 
© 2026 Incomaker Support
- Log in to technical support at https://www.binargon.cz/podpora/
- In the “Správa webů” (Website Management) tab, select the e-shop for which you want to activate the Incomaker service.
- Check the box for the Incomaker module and click “Objednat” (Order).
After completing these steps, Binargon’s technical support will inform you about the next steps.
What happens after you connect your e-shop in Incomaker? After connecting your e-shop, we download all the necessary data to offer your customers personalized product recommendations. All data feeds are then automatically and regularly updated, so you don’t have to worry about changing the feeds after every change on your e-shop.
Contacts
The contact feed contains a database of all your customers and their information. Thanks to basic data such as name, gender, or location, it is possible to set up a personalized campaign in Incomaker tailored to the characteristics of each customer.
Incomaker automatically divides the customer database from the contact feed into 2 basic mailing lists:
- NEWSLETTER – This category includes all customers from whom you have explicit consent to send newsletters. This includes those who checked the box to subscribe to the newsletter when registering on your e-shop, set it up in their profile, or subscribed to the newsletter via your pop-up or a form on your website.
- E-SHOP CUSTOMERS – All contacts in your database will be included in this category. These are all the contacts who have registered with you, as well as those who have already purchased something from you even without registering on the e-shop. You can also freely segment all contacts according to your own criteria.
Products
The product database is important when creating product offers in campaigns. Thanks to the specified product properties, we can offer customers, for example, only discounted products, new arrivals, best-selling products, slow-moving stock, etc. You can check all the uploaded products in the system on your profile via the gear wheel in the upper right corner. How to select specific products for campaigns? You will learn that in this detailed guide.
Orders
The order feed contains information about all of a customer’s historical orders on your e-shop. This data is then used to analyze customer purchasing behavior, the results of which are then applied, for example, in reactivation campaigns, upselling, and other campaigns. Do you want to increase conversions? Incomaker can offer your customers products similar to those they last purchased on your e-shop.
You can set up the e-shop yourself using the quick setup function, or we can do the entire setup for you for a fee. However, if you need help with anything, you can of course contact our support at support@incomaker.com, where we will be happy to advise you.
Go to the add-on page in the Shoptet Marketplace: https://doplnky.shoptet.cz/incomaker-essentials and click on Order add-on.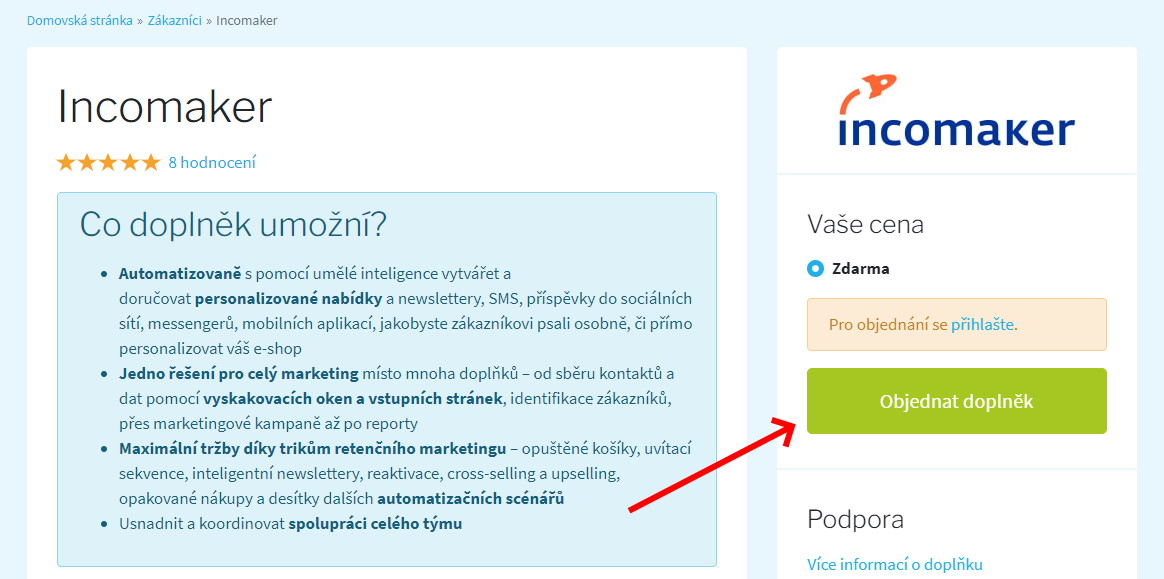
After ordering the add-on, an account will be created for you in Incomaker and you will receive an e-mail with detailed instructions. If you already have a pre-existing account in Incomaker, please contact support at support@incomaker.com and they will link your accounts.
The Incomaker tracking code can be embedded either directly into the page or via Google Tag Manager or other similar tools. Embedding the code directly into the page is the preferred alternative, but if that is not possible, Google Tag Manager is a good alternative.
In Tag Manager, click on Add new tag:
A window with two large panels will open. Click on the top panel (Tag Configuration) and a menu of tag types will open. From there, select Custom HTML. In the HTML field, enter the tag code from Incomaker.
Then click on the bottom panel Launch and select All pages from the list.
In the top left corner, you can name the tag something. Then click the Save button in the upper right.
ATTENTION! This does not complete the process. You must publish the changes, otherwise they will not show up anywhere and the code will not work. After saving the tag, you will return to the main preview. There is a Submit button in the top bar on the right.
Clicking this button will activate the code display.
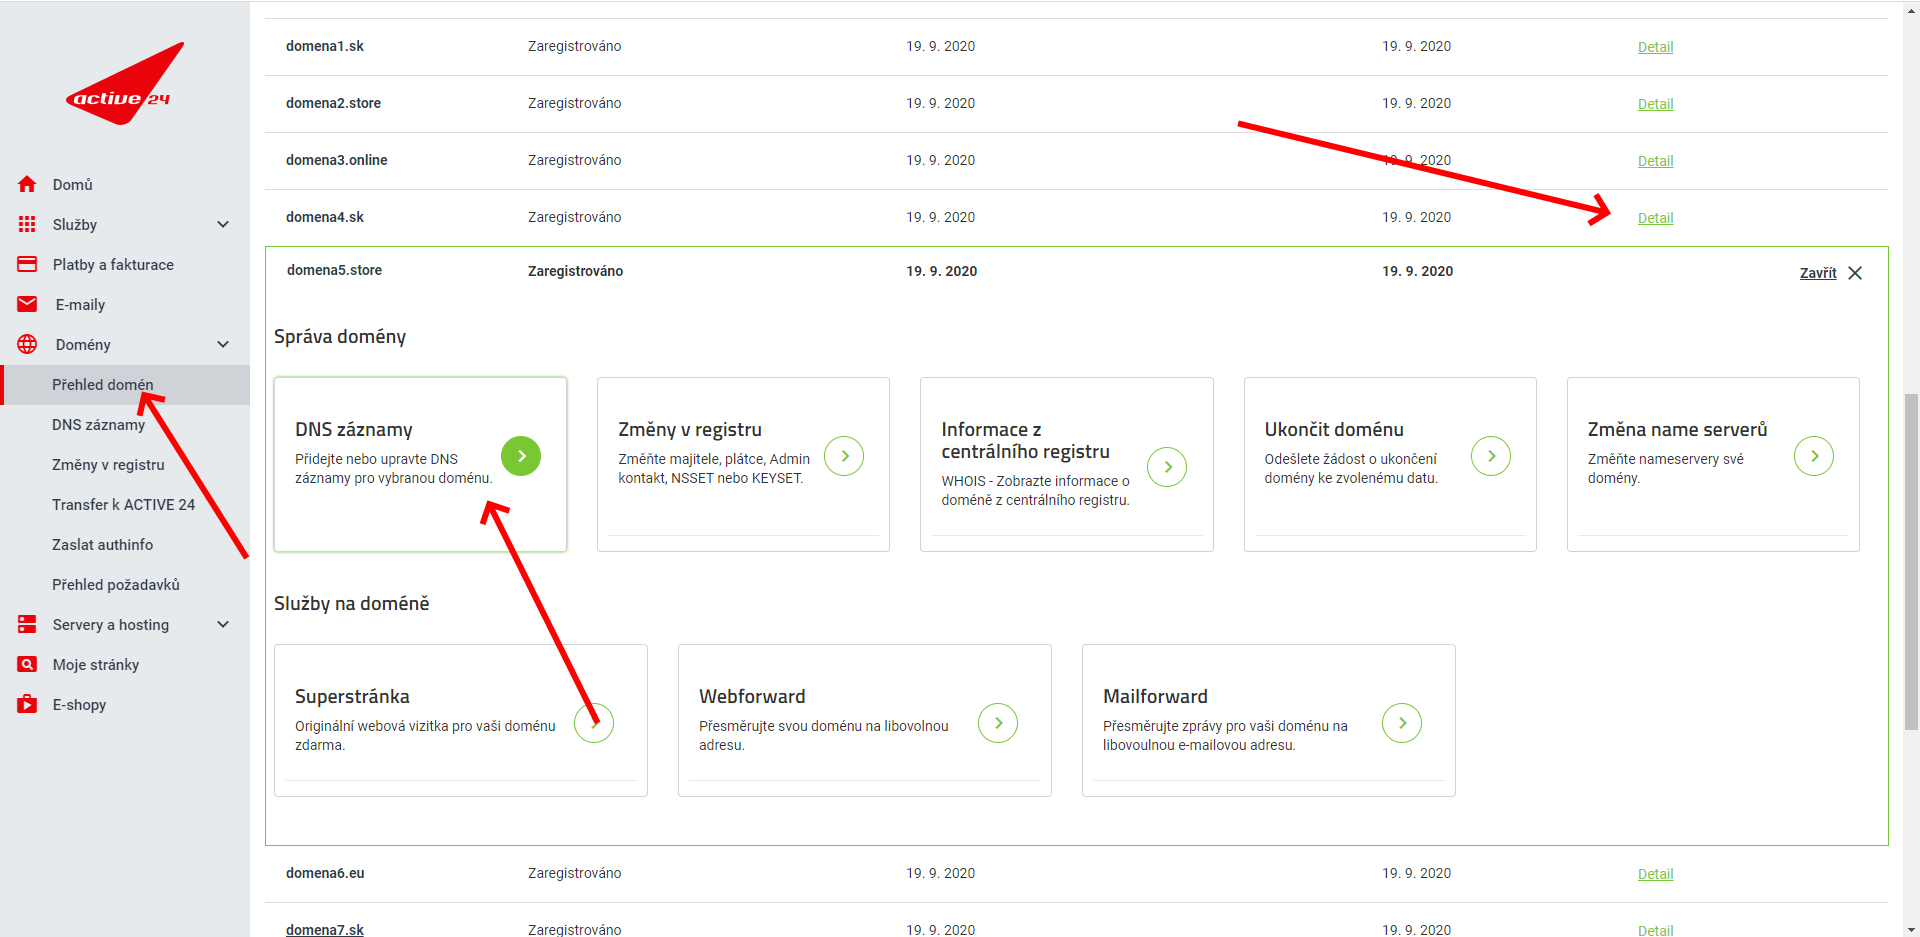
Log in to your account at customer.active24.com. In the left-hand column, click Domains and then Domain Overview, and on the right select the domain of your website or e-shop (click Detail). The Domain Management screen should expand, looking roughly like the example below. Then click DNS Records.
SPF
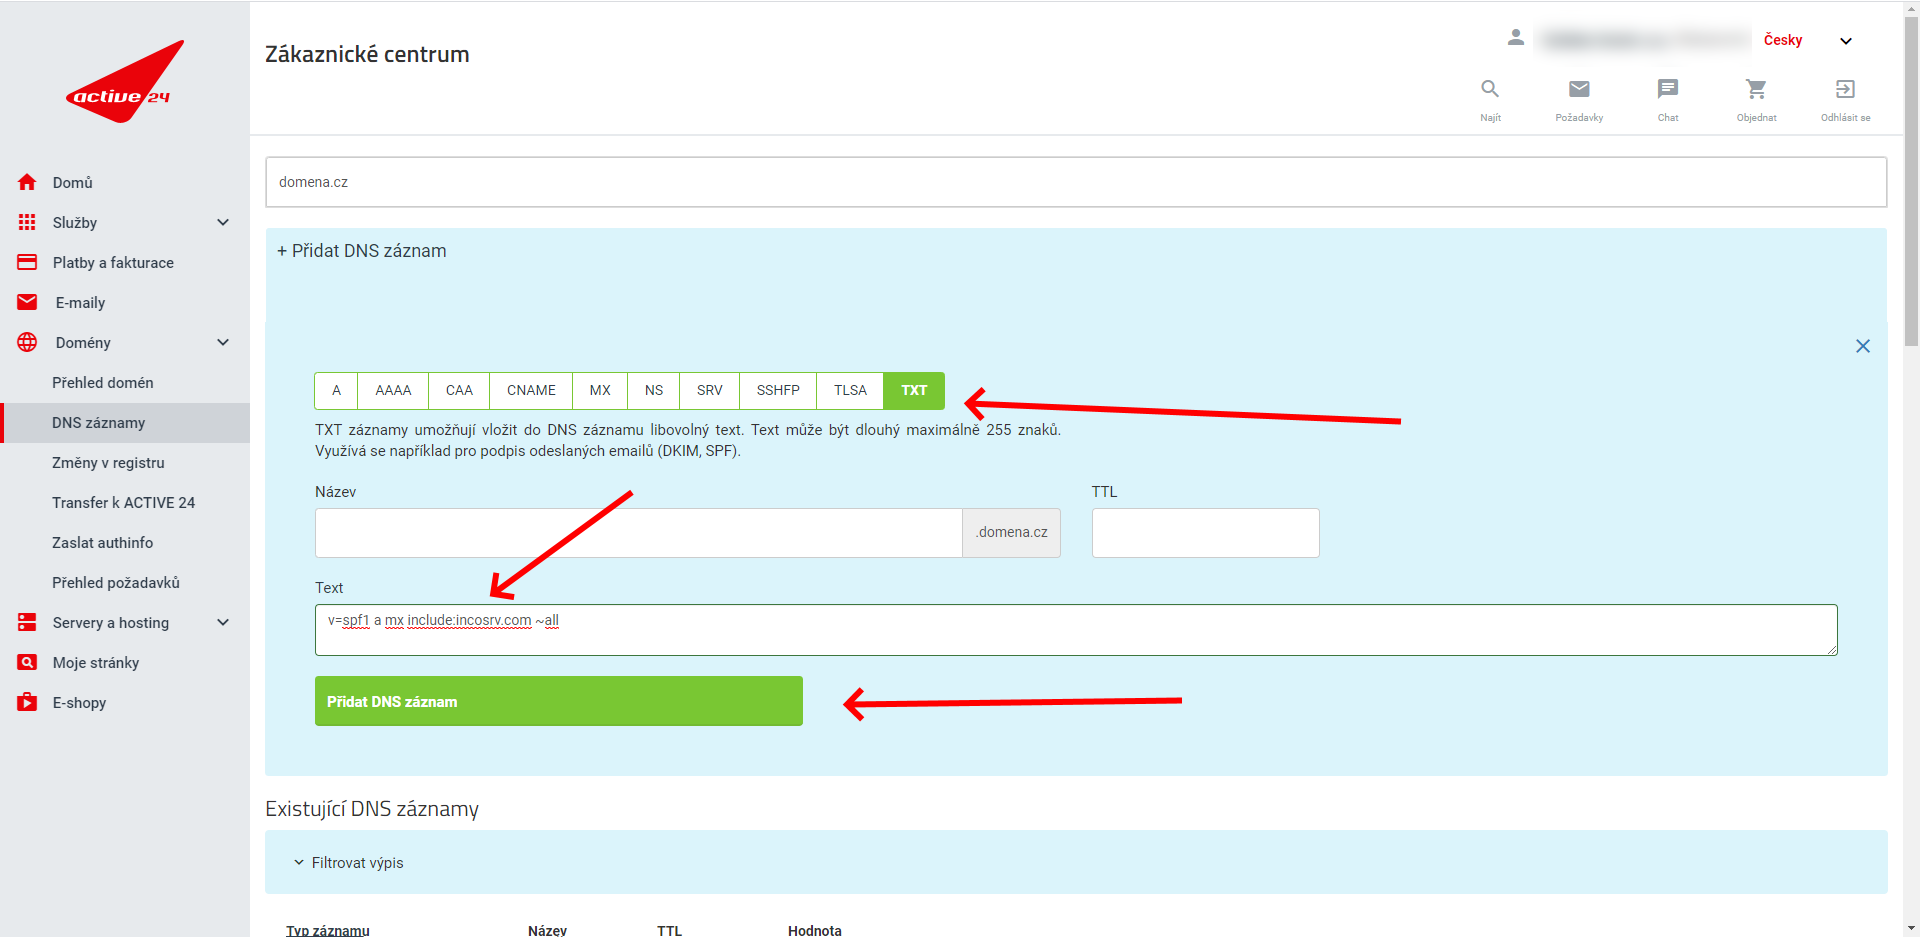
In the Add DNS Record section, click TXT and paste the following text into the Text field. Finally, click Add DNS Record.
v=spf1 a mx include:incosrv.com ~all
It may happen that a TXT record is already set up (for example, if you’ve previously used another email tool). You’ll recognize this if there’s an entry in the table below, in the Value column, that begins with Text: v=spf1. If that’s the case, click Edit on that row, and you can modify the record. All you need to do is insert the text include:incosrv.com anywhere except at the very beginning or the very end.
DKIM
Now you need to go into your Incomaker account, click the main Campaigns tab, and in the left-hand menu, click DNS Settings. An alternative route is via the Overview / My Designs / DNS Settings tab.
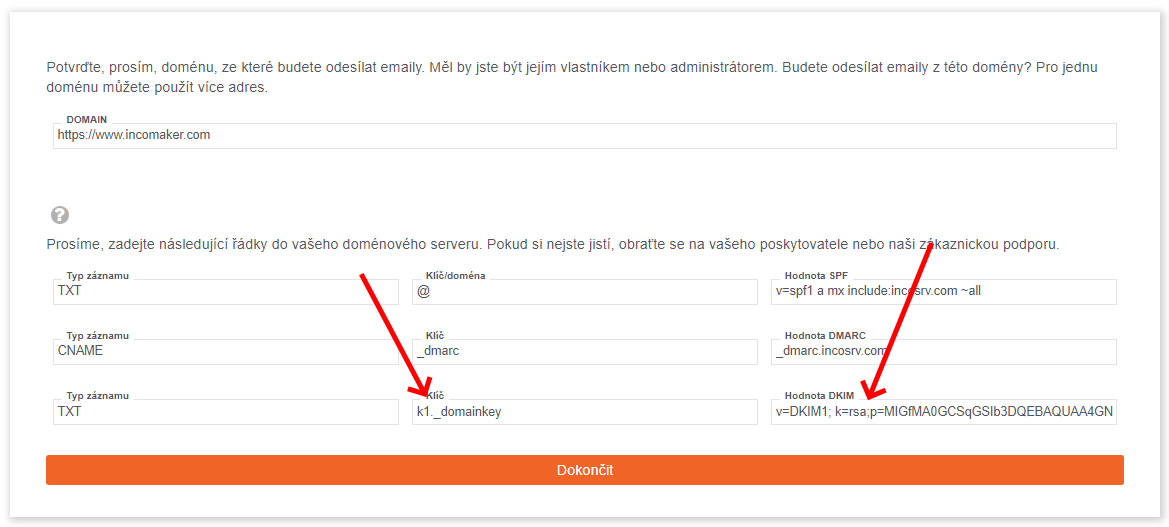
The row we’re interested in is the last one.
Switch back to Active24. In the Add DNS Record section, click TXT again. In the Name field, enter what’s shown in Incomaker’s Key field, and in the Text field, paste the text from Incomaker’s DKIM Value field. Finally, click Add DNS Record. Back in Incomaker, click Finish. The result should look roughly like the example below.
DMARC
In the Add DNS Record section, enter the following value into the Name field:
_dmarc
Into the Text field, paste the following and click Add DNS Record. Another record will appear on the screen.
v=DMARC1; p=none; sp=none; rua=mailto:postmaster@incosrv.com; ruf=mailto:postmaster@incosrv.com; rf=afrf; pct=100; ri=86400
Log in to the Customer Administration. In the left-hand column, click Domains, and on the right select the domain for your website or e-shop. The Domain Details window should open and look approximately as follows. Then click Edit DNS Records.
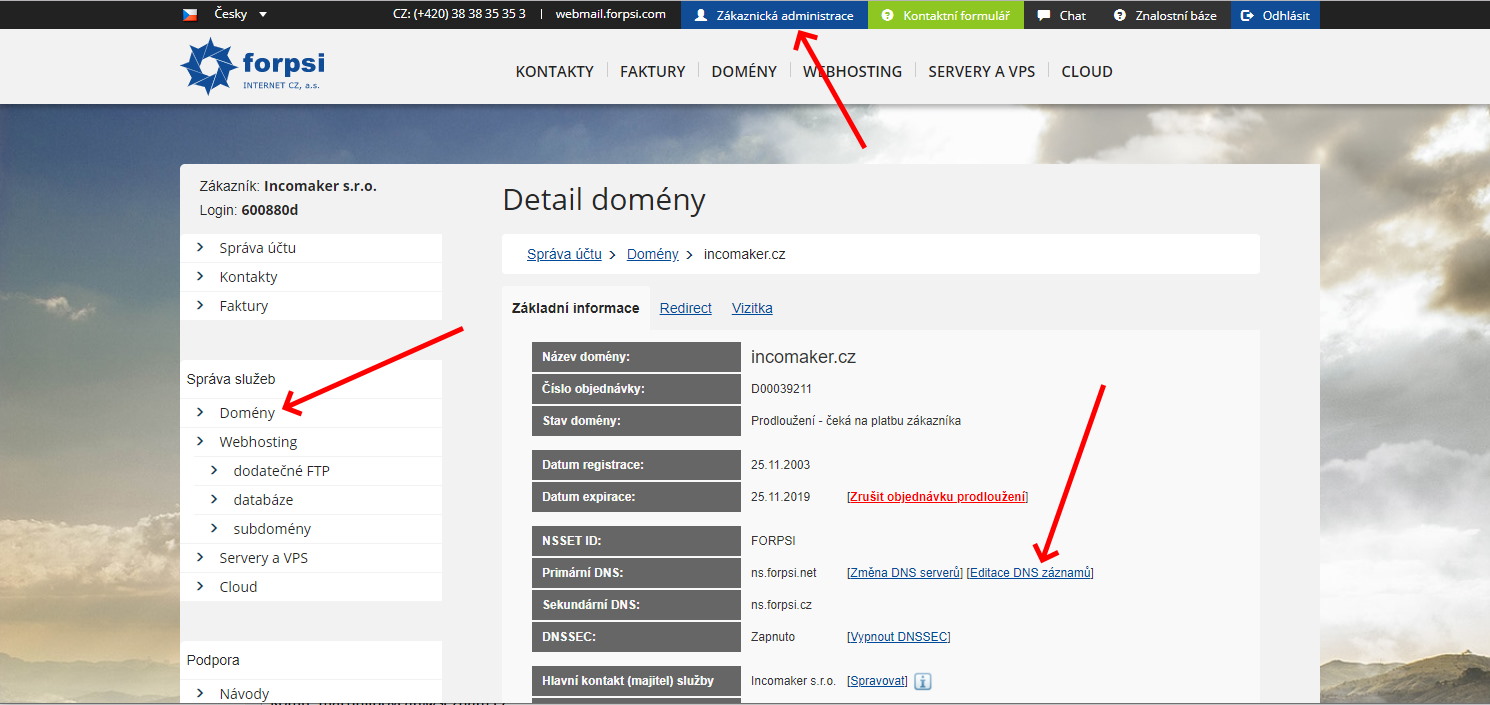
SPF ( Sender Policy Network)
In the Type field, select TXT. Leave the Hostname and TTL fields unchanged. In the Value field, enter the following text. Finally, click Save.
"v=spf1 a mx include:incosrv.com ~all"
It is possible that a TXT record is already configured (for example, if you have previously used another email-related service). You can identify it by checking whether there is a record in the table below whose Value begins with v=spf1.
If this is the case, click Edit next to that record. You can then modify the record using the form above. Simply insert the text include:incosrv.com anywhere in the record except at the very beginning or the very end.

DKIM ( Domain Keys Identified Email)
Now you need to log in to your Incomaker account, click the main Campaigns tab, and then click DNS Settings in the menu on the left-hand side.
Alternatively, you can access it through Overview → My Suggestions → DNS Settings.
We are interested in the last row.
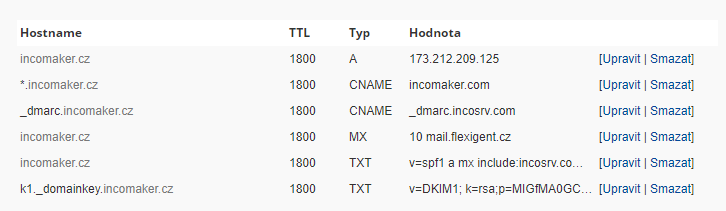
Switch back to Forpsi. In the Type field, select TXT. In the Hostname field, enter the value shown in the Key field in Incomaker. Copy the content from DKIM Value (in Incomaker) into the Text field (in Forpsi), then click Save.
In Incomaker, click Finish.
The result should look approximately as follows:
DMARC ( Domain Based Message Authentication, Reporting, and Conformance)
In the Type field, select TXT. This time, enter the following value in the Hostname field:
_dmarc
In the Value field, enter the following text and click Save. A new record will then appear on the screen:
v=DMARC1; p=none; sp=none; rua=mailto:postmaster@incosrv.com; ruf=mailto:postmaster@incosrv.com; rf=afrf; pct=100; ri=86400
The configuration is now complete. It may take some time for the changes to take effect, but within an hour you should be able to send emails securely without any issues.
If you are having trouble with the configuration, please contact our support team, for example through the chat in the bottom-right corner. We will be happy to assist you.
Log in to your account at puvodni.domena.cz. In the left-hand menu, click Domains, and then select the domain associated with your website or e-shop. This will open the Domain Details page, which should look similar to the example shown below. Next, click Edit DNS Records.
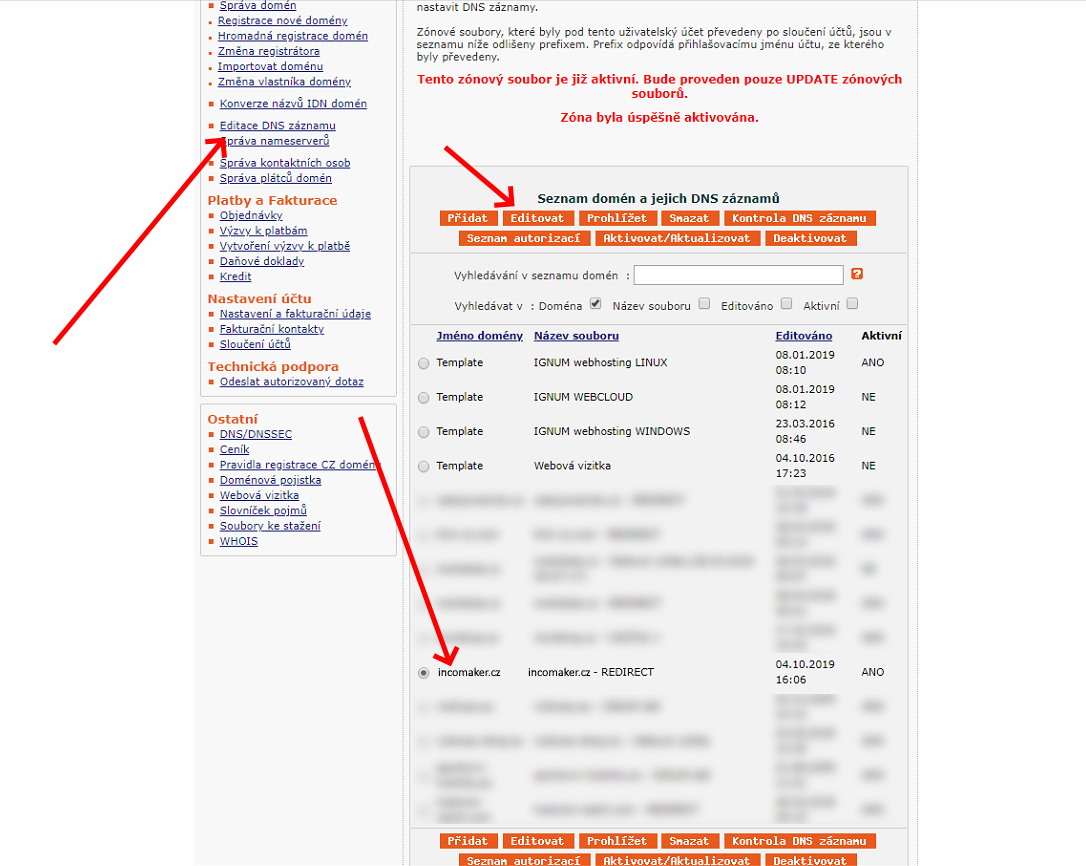
SPF (Sender Policy Framework)
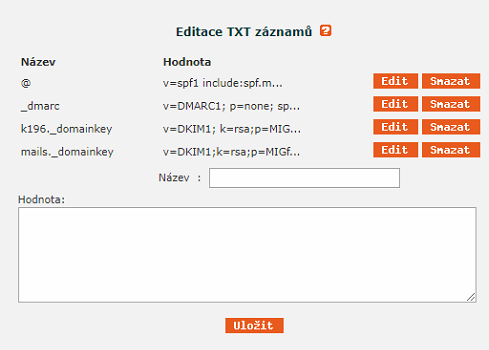
In the Edit TXT Records section, enter the @ symbol in the Name field and paste the following text into the Value field. Finally, click Save.
"v=spf1 a mx include:incosrv.com -all"
It is possible that an SPF TXT record is already configured (for example, if you have previously used another email marketing or email service provider). You can identify this by looking for a record in the table below whose Value begins with v=spf1.
If such a record exists, click Edit on that row and modify the existing record instead of creating a new one. Simply add the text include:incosrv.com anywhere within the SPF record, except at the very beginning or the very end. This will authorize Incomaker’s mail servers while preserving the existing configuration.
DKIM (DomainKeys Identified Mail)
Next, log in to your Incomaker account, click on the main Campaigns tab, and then select DNS Settings from the menu on the left-hand side.
Alternatively, you can access it by navigating to Overview → My Suggestions → DNS Settings.
We are interested in the last row.
Switch back to Ignum. In the Name field, enter the value shown in the Key field in Incomaker. In the Value field (in Ignum), copy and paste the contents of the DKIM Value field from Incomaker, then click Save.
After that, return to Incomaker and click Finish.
The final result should look approximately like the following:
DMARC (Domain- based Message Authentication, Reporting, and Conformance)
In the Edit TXT Records section, enter the following into the Name field:
_dmarc
In the Value field, enter the following text and click Save. A new record will then appear on the screen:
v=DMARC1; p=none; sp=none; rua=mailto:postmaster@incosrv.com; ruf=mailto:postmaster@incosrv.com; rf=afrf; pct=100; ri=86400
Activation
Unlike most other hosting providers, Ignum requires you to manually activate changes after editing DNS records.
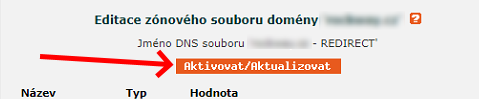
To do this, go to the top of the Domain Edit page and click Activate / Update. This step is necessary for your DNS record changes to take effect.
Attention! Even if your online store runs on Shoptet, it does not necessarily mean that your DNS (name records) are managed by Shoptet as well. If that is not the case, this guide does not apply to you, and you should refer to the instructions provided by your DNS provider instead.
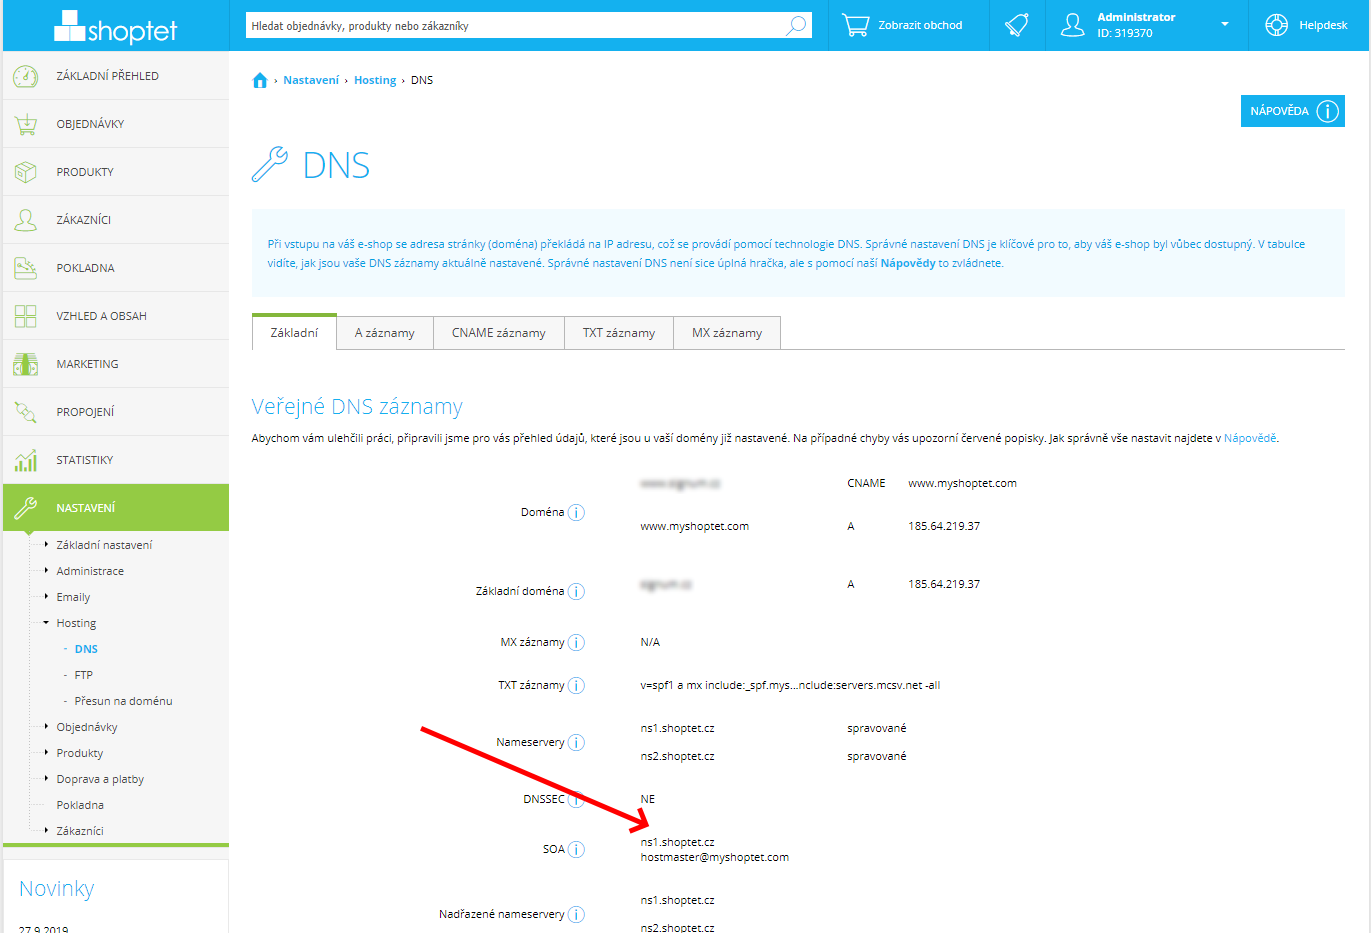
Open your store administration, then go to Settings / Hosting / DNS. You should see something similar to the following screenshot. If you do not see references to shoptet.cz, especially in the SOA record, then Shoptet does not manage your domain and this guide cannot be used. Otherwise, continue.
SPF (Sender Policy Framework)
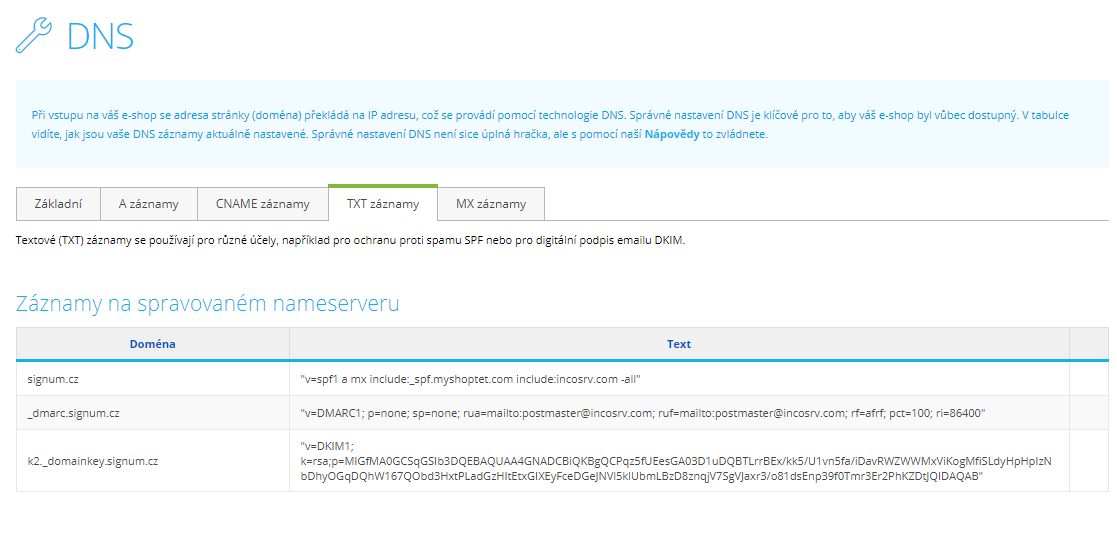
Click on the “TXT records” tab. If you see the same value in the “Text” column as shown in the following image, you can delete the record (the icon on the right will appear when you hover your mouse over it).

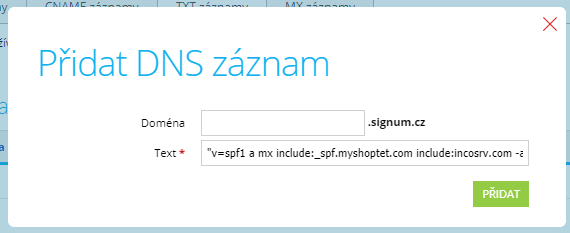
After deleting it, click the blue “Add” button in the top right corner. In the dialog that appears, leave the “Domain” field empty and paste the following text into the “Text” field, then click “ADD.”
"v=spf1 a mx include:_spf.myshoptet.com include:incosrv.com ~all"
DKIM (Domain Keys Identified Mail)
Now you need to log into your Incomaker account, click on the main “Campaigns” tab, and in the left-hand menu click on “DNS settings.” Alternatively, you can go via Overview / My proposals / DNS settings.
We are interested in the last row.
Switch back to Shoptet and again click the blue “Add” button in the top right corner. In the “Domain” field, copy exactly the text that is in Incomaker in the “Key” field, and in the “Text” field (in Shoptet), paste the value from “DKIM value,” then click “Add.” In Incomaker, click “Finish.” The result should look roughly as follows:

DMARC (Domain-Based Message Authentication, Reporting and Conformance)
We are still in the “TXT records” tab and again click the blue “Add” button in the top right corner. This time, in the “Domain” field, we enter:
_dmarc
In the “Text” field, you enter the following and click “Add.” A third record will appear on the screen.
v=DMARC1; p=none; sp=none; rua=mailto:postmaster@incosrv.com; ruf=mailto:postmaster@incosrv.com; rf=afrf; pct=100; ri=86400
That completes the setup. It may take some time for the changes to take effect, but within about an hour, you should be able to send emails safely.
If you are having trouble with the setup, please contact our support, for example via the chat in the bottom right corner—we will be happy to help you.
Bounce domain settings
Go to the “CNAME records” tab and click the “Add” button.
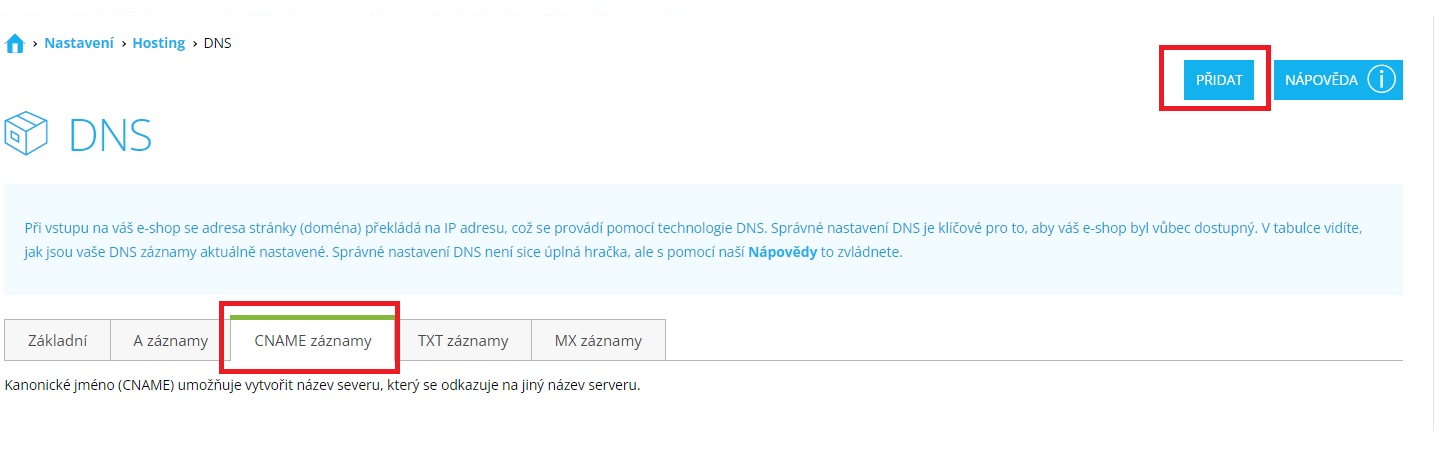
In the window that opens, we first set the bounce domain for the SPF record. In the “domain” field, enter “news” and in the “target domain” field, enter the name of your email domain; in our case, it is “signum.cz”. Confirm by clicking “Add.”
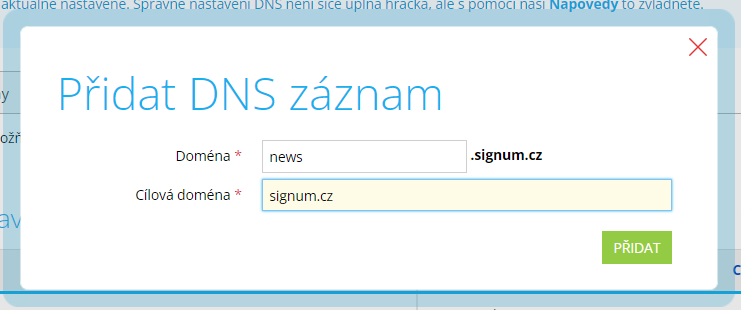
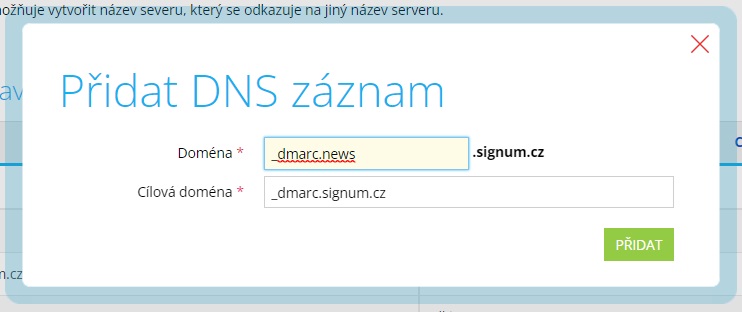
Click the “Add” button again, and this time we will create a bounce domain for the DMARC record. In the “domain” field, enter “_dmarc.news” and in the “target domain” field enter the DMARC record created in the previous steps; in our case “_dmarc.signum.cz”. Again, confirm by clicking “Add.”
Finally, we will set the bounce domain for the DKIM record, which is done a bit differently. First, in Incomaker, in the “Campaigns” tab, expand the “Settings” menu in the left-hand panel and select “DNS settings.”
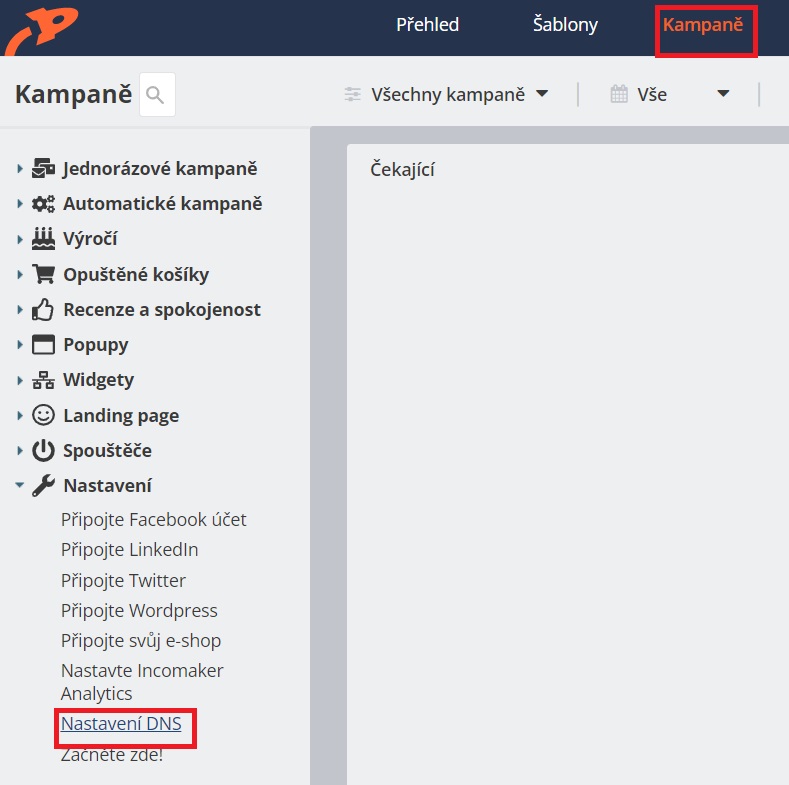
Finally, we will set the bounce domain for the DKIM record, which is done a bit differently. First, in Incomaker, in the “Campaigns” tab, expand the “Settings” menu in the left-hand panel and select “DNS settings.” In the “domain” field, enter your domain name with “news.” in front of it — in our case news.signum.cz — and click the “Generate DNS records” button.
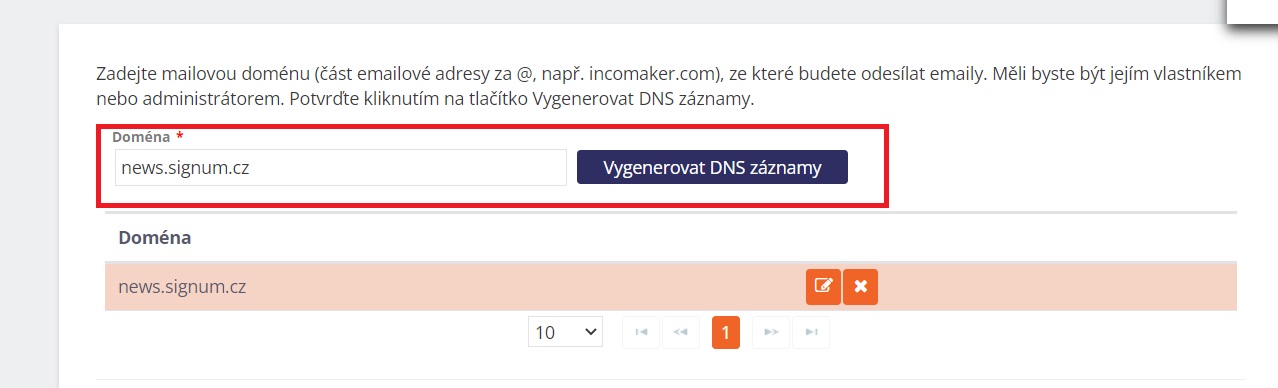
You set this record in the same way as you set the DKIM record; it is described in the section titled “DKIM” in the guide.